
VMOS Cast Product Manual
Quality and device compatibility
Android focus windows and multi-view panes request the device's original picture by default; a small window or pane does not lower the source resolution. Local hardware decoding and the device encoder may still limit the actual size. The focus window's Quality panel can lower it explicitly; choosing Original restores the Full Screen FPS and Bitrate from Settings. Keep size alignment on Auto normally; try 8 or 16 px for device-specific picture issues. Changes affect only this focus window and failed changes attempt to restore the previous configuration.
iOS USB connection
After selecting Install / repair Apple device support on Windows, the page shows component checking, actual download percentage, file and signature verification, and the waiting-for-installer stage. The pre-install Apple service check does not depend on capture-driver checks. Complete the Windows administrator prompt and Apple licence wizard; use the taskbar if the wizard is hidden. Retry a failed download, or select Download the official Apple component manually to download the same official MSI, run it, then return and select Detect again. A completed download does not mean installation succeeded.
If Apple device support is missing or its service is stopped, the page offers Install / repair Apple device support without waiting for a full device and capture-driver scan. Once the Apple service is ready, the client checks the connected device's capture driver. If prompted, select Install capture driver for this device and approve the administrator request.
USB and wireless mirroring are independent. After selecting USB in this panel, switching to Android and back to iPhone / iPad does not start the wireless receiver; selecting Wireless enables that channel. Switching guide pages does not automatically stop a wireless receiver that is already enabled.
macOS uses built-in Apple USB support and does not require the Windows Apple device support package or capture driver. The client must bundle its USB capture and control helpers; users do not need to install Python. If a helper is missing, reinstall the complete client rather than following the Windows driver steps.
Windows prerequisite checks cover the capture driver service, file integrity and signature, Apple parent driver and device filter. Ready does not replace actual video validation. Unplugging during connection reports a disconnected device; stopping intentionally does not report connection failure. Re-enabling control waits for the previous control process to release its resources before opening a new channel.
The USB page is under Add device → iPhone / iPad → USB. Connect a data cable, trust the computer on the phone, then select the device to start mirroring. Open its device card after video arrives. USB control is separate from wireless Bluetooth control and uses the existing focus-window toolbar.
The Windows USB connection steps include a separate reminder: After installing or reinstalling the components, if you have tapped Trust but no device appears below, unplug and reconnect the USB cable, then select “Detect again”. First follow the standard instructions to unlock the phone and trust the computer. If the device already appears in the list below, there is no need to reconnect the cable.
macOS USB taps, drags, and computer keyboard input have been verified on the connected phone, not across all devices. English keys, Shift, Backspace, and Enter are supported; use the phone input method for Chinese. An OS upgrade is not a prerequisite for this verification.
The Windows USB page provides installation actions for Apple device support and the connected device's capture driver. Administrator approval and user acceptance of Apple's license are required; there is no need to disable system security. Enabling control checks Developer Mode and developer support components and attempts to prepare missing components. Mirroring and control use USB without automatic Wi-Fi or Bluetooth fallback. Control availability depends on the phone's operating system and device checks; viewing remains available when control is unsupported.
If the Windows capture driver is installed but USB video is missing after reopening, use Repair USB connection on the USB page. Stop USB mirroring first and accept the administrator prompt. This reconnects only the selected iPhone, without restarting the shared Apple service or replacing drivers. If recovery still fails, reconnect the cable and unlock the phone.
Clicking an idle USB card immediately shows Connecting. Repeated clicks during connection do not start additional requests; identical errors are grouped, and you can retry after the connection attempt finishes. When the device is detected as disconnected or mirroring is stopped, the current connection wait ends without waiting for the first-frame timeout; reconnect the device to retry.
Contact support and diagnostic logs
After a successful upload, the diagnostic ID appears under Settings → About → Export logs. Click it to copy it, then send it to support when reporting the problem in chat. Support can use the ID to locate the matching diagnostic attachment on the same event.
Selecting Online chat, Telegram or Email under Contact support uploads the same diagnostic ZIP as Export logs in the background, as explained under Settings → About → Export logs. Logs are not additionally redacted and may contain device identifiers, paths and diagnostics; select a channel only if you agree to provide this information. No login is required: a persistent installation ID associates the report. Support can locate the associated logs in the backend after upload. Device information is context, not a diagnosis that a particular phone is faulty.
Contact remains available during upload or failure. Concurrent requests merge; successful reports are reused for two minutes. Archives above 20 MB, network failures or missing desktop logs prompt manual export in Settings instead of silent truncation. Nothing is automatically posted to the Telegram group. This only uploads logs when contacting support, without automatic error capture or source upload.
Connection and control essentials
- Android supports USB and LAN connections from multiple clients. Avoid simultaneous dragging. Confirm the wireless picture is live before unplugging USB. Performance depends on the network and devices.
- Multi-view and group control include available Android devices only. iPhone / iPad retain independent mirroring and device management, without multi-view or group control.
- Windows and macOS support direct iPhone control over compatible Bluetooth hardware. Follow the illustrated guide to enable Accessibility › Zoom, restore normal picture size, then verify a tap. Linux does not support iOS control. This is not USB control.
Plugin page and custom packages
Plugins beside All devices opens a full page, not a catalog dialog. Search plugins, manage built-in WeChat enhancement, or drop a local .zip / .vmosplugin package. New packages start disabled; review permissions before enabling. Enable, disable and uninstall synchronize to open displays without interrupting mirroring.
The plugin center separates Browse plugins, User plugins and Developer docs. Details show permissions and compatibility; WeChat settings and phrases remain built-in. Searchable offline documentation covers the integration model, manifest, device/app hooks, toolbar, panels, permissions/actions, lifecycle, errors and acceptance. Three installable examples demonstrate app notes, app-specific tools and text filling. Current hooks are declarative, not executable scripts; foreground app detection and text filling are Android-only and never send automatically. Online distribution, auto-updates and persistent plugin storage are unavailable. See Custom plugin development. Plugin cards offer details and enable/disable controls; only user-installed plugins can be uninstalled. Plugins currently support Android devices only. The client interface and built-in plugins follow the language setting; user-installed plugin content is displayed as supplied by its author, without automatic translation.
WeChat quick replies
Enable WeChat enhancement and manage phrases under Plugins; no separate installation is needed. Quick replies appear on the right of a controllable Android display while WeChat is foreground. The panel expands beside the picture rather than covering it. Detection is based on the current app, not the country or region of the phone number used to sign in to WeChat. Quick replies, Quality and Terminal share one right-side panel: selecting another tool replaces its contents instead of stacking panels.
- Create, edit, delete, copy, import and export phrases, or search by title. Phrases contain a title and text, without groups or favorites.
- In an independent display window, Fill replaces all input with the selected phrase without sending; Send replaces all input and then sends that phrase. Any existing draft is replaced, not combined with the phrase. Multi-view still inserts at the current cursor and does not support quick sending.
- Select Enter or Ctrl/Cmd+Enter to send the current input without replacing it or inserting a phrase; it does not need to match a saved phrase. The default retains normal key behavior. Shift+Enter inserts a newline and IME confirmation does not send.
- While a send-shortcut request is pending, further typing or clicking in this client, or taking focus away from the display window, cancels the send before it executes. Do not edit the draft or switch chats on the phone or another client during the operation; those actions are outside this window's cancellation detection.
- Recognition uses the chat title and controls flanking the input, supporting light and dark portrait layouts with different status-bar heights. Chat wallpapers and keyboard skins are not used to identify the input. Sending does not transcribe the draft or wait for an empty-field caret to blink. Offline OCR regression covers varied backgrounds, keyboard skins, font sizes, multiline drafts and compressed low-resolution images. An obscuring overlay or an unconfirmed chat or Send button prevents the click; messages are never resent automatically. Landscape, split-screen, repackaged or cloned apps and non-Chinese WeChat interfaces are not fully verified; compatibility with every third-party theme is not guaranteed.
- First opening shows preparation progress. Empty Enter, missing Send and page changes end silently. A completed replacement without a Send click does not show an unknown-outcome warning; check the WeChat input. Normal sending has no result toast; check WeChat for the outcome. Unknown text-write or send-control results and connection errors still show a notification; check before clicking again. Phrases stay on this computer; exports contain message text and should be kept private.
VMOS Cast is a free desktop application that brings the live screens of multiple Android devices onto one computer for side-by-side monitoring, with mouse and keyboard control back to each device. No application is installed on the phones and no account is required. Video and input stay on the local network and never pass through a cloud server.
Every screenshot in this manual is taken from the released application. For first-time setup, see Quick Start; this page is the full reference. Installers are listed on the Release History page.
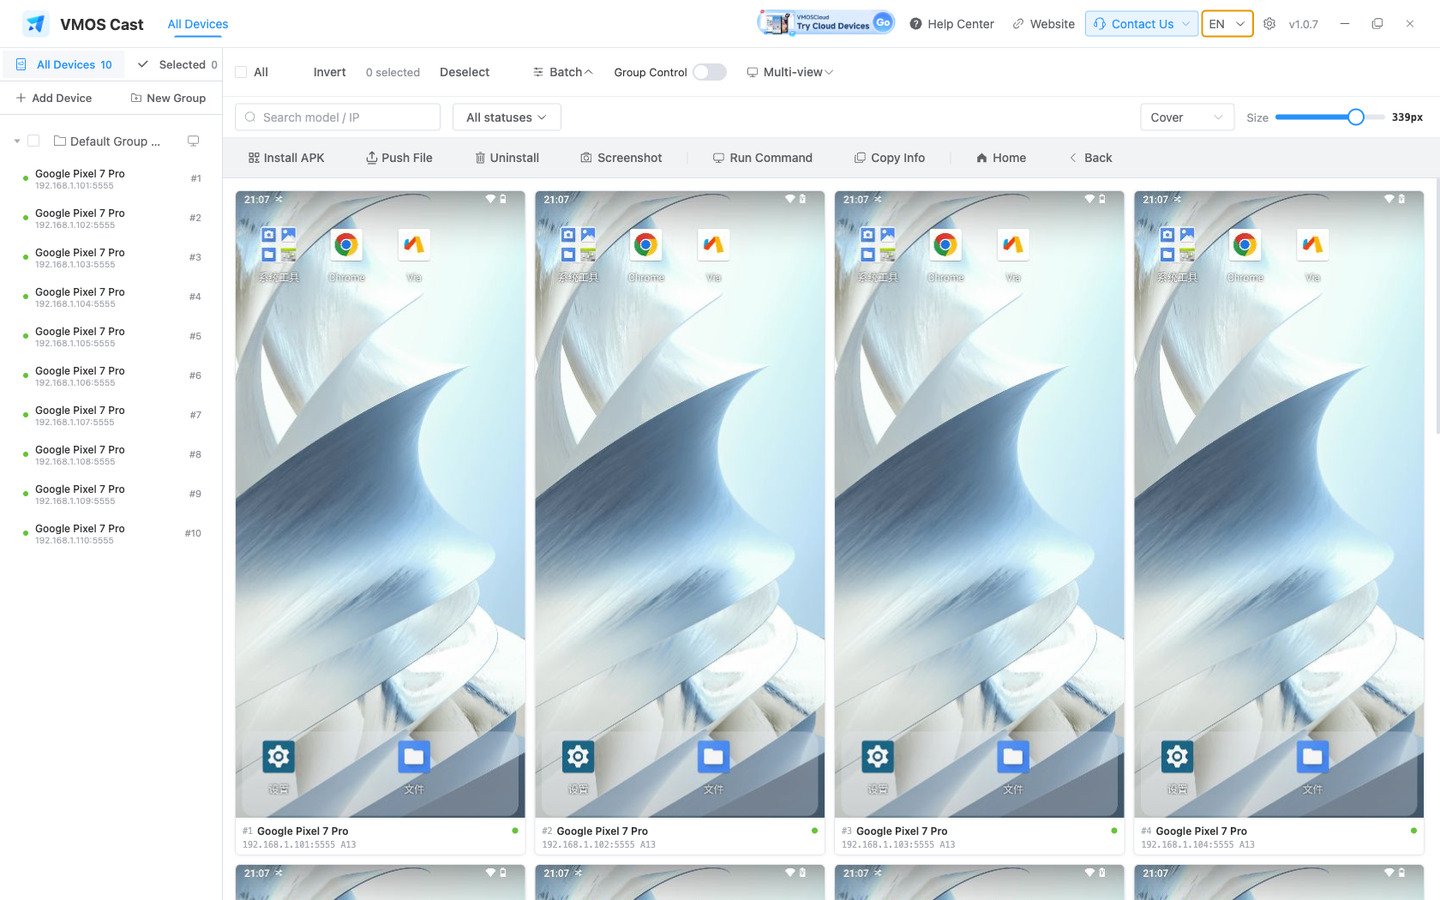
1 Interface Overview
The window has four areas, matching the screenshot above from left to right and top to bottom:
| Area | What it does |
|---|---|
| Top bar | Help Center, website, Contact Us (live chat / Telegram group / email), language, settings, version |
| Sidebar | All Devices / Selected / group tree, Add Device, New Group; Move and Remove appear at the bottom once devices are selected; the width is draggable and is kept for next launch |
| Toolbar | Select All, Invert, Clear, Batch, Group Control, Multi-view; on the right: search, status filter, Scale, window size |
| Device wall | One live picture per device. Click the picture to open the focus window, click anywhere else on the card to select it |
The interface ships in 21 languages — click the language button in the top bar; the dropdown lays them out in three columns without scrolling. Arabic and Urdu mirror the whole layout right-to-left, while device pictures keep their original orientation.
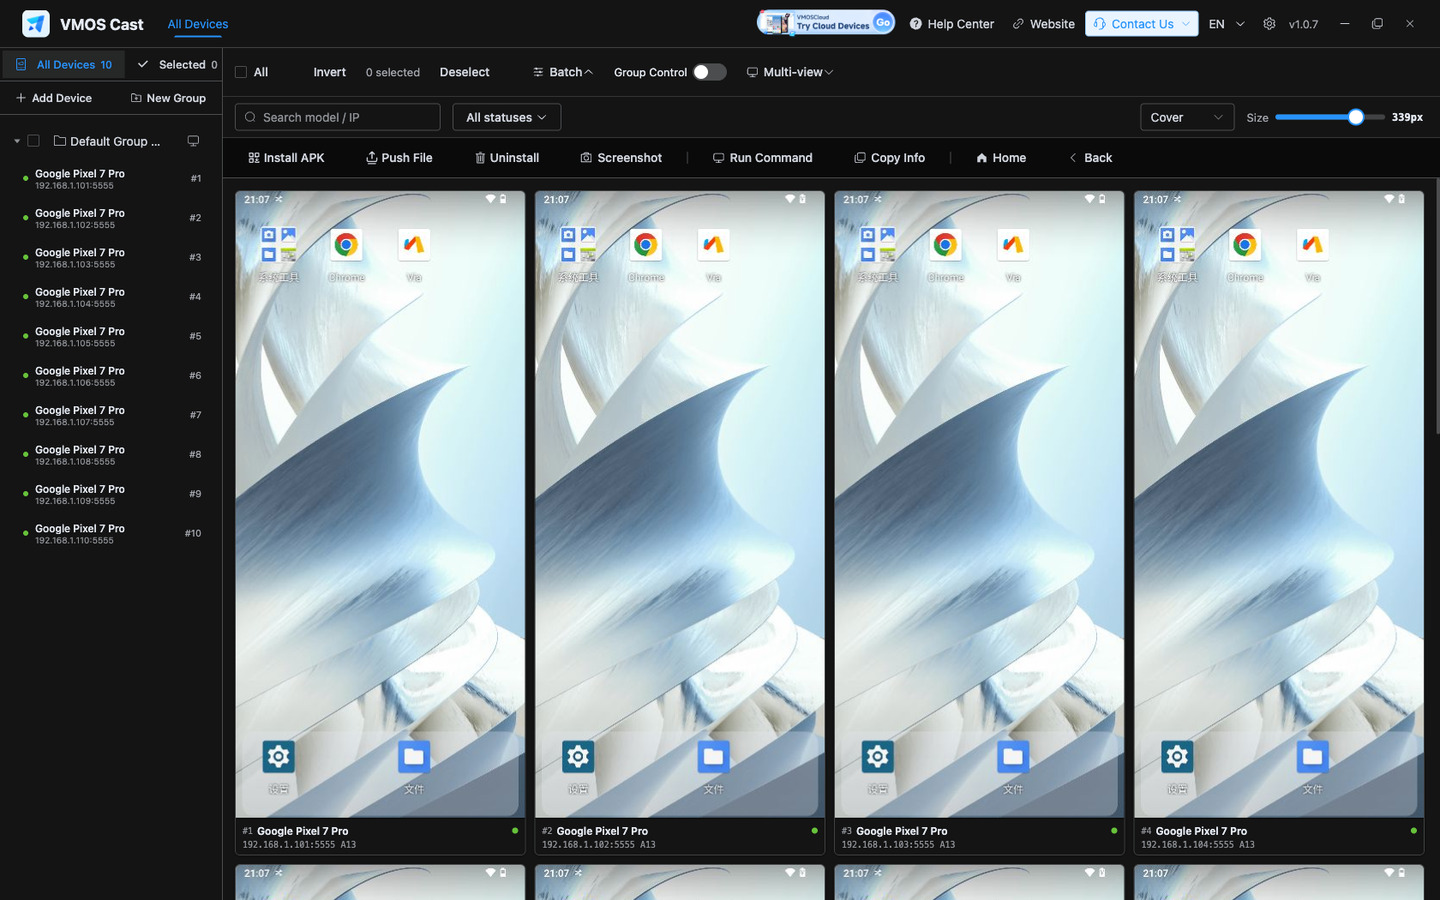
For extended monitoring sessions, switch to the dark theme (Settings → Appearance → Theme):
2 Connecting Devices
TIP
USB works out of the box; nothing additional has to be installed on the computer. Android 8 is the oldest supported version.
The connection method is determined by the type of device:
IP:5555, or scan a subnetClick Add Device in the sidebar and pick a connection method:
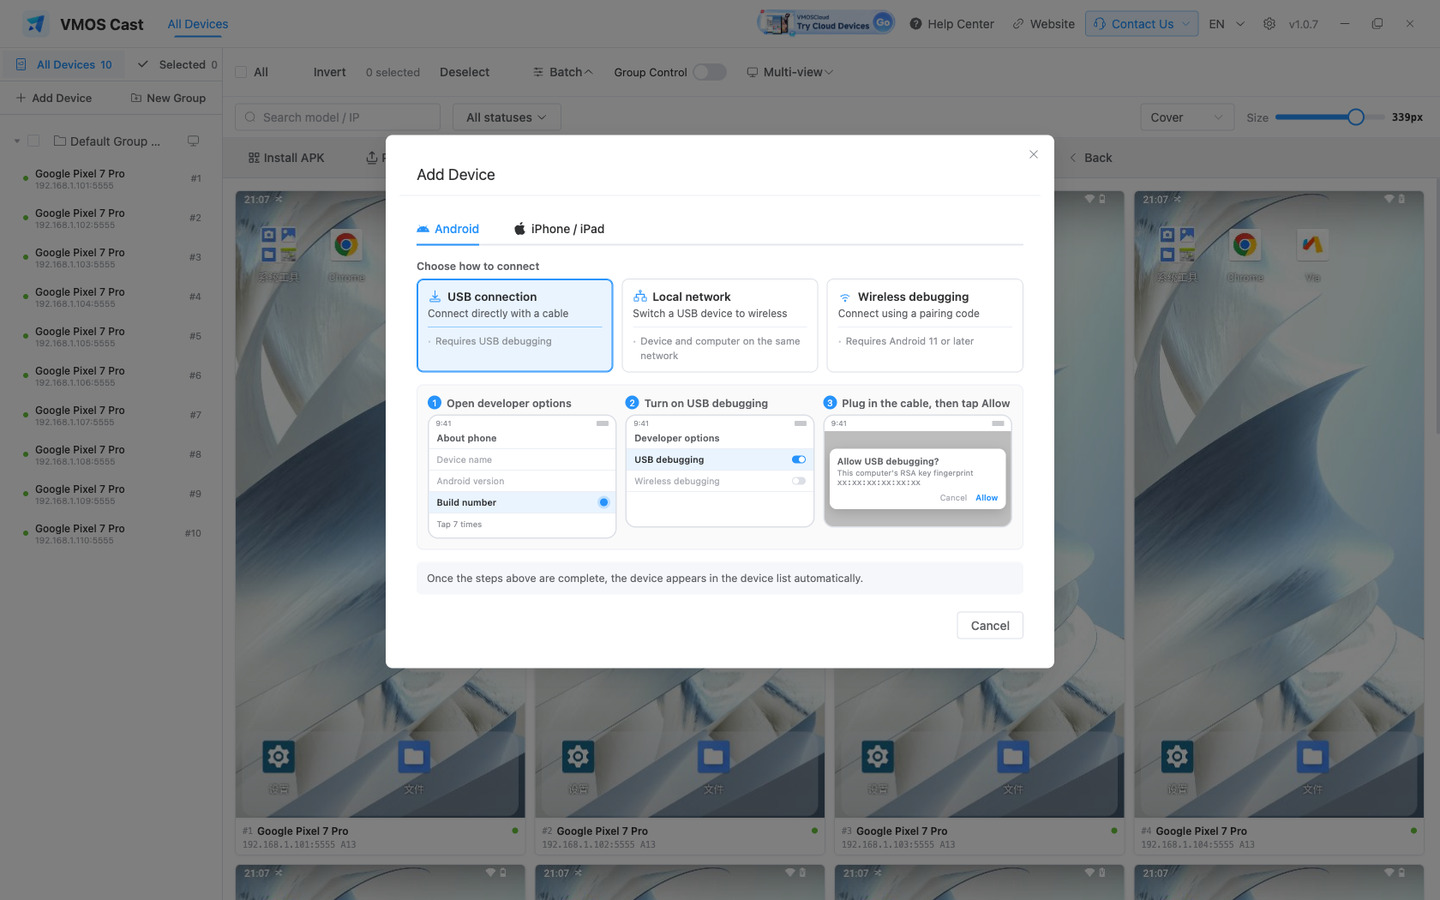
2.1 USB cable
Use this the first time a physical Android phone is connected. Follow the three steps shown; the device appears on the wall as soon as it is plugged in:
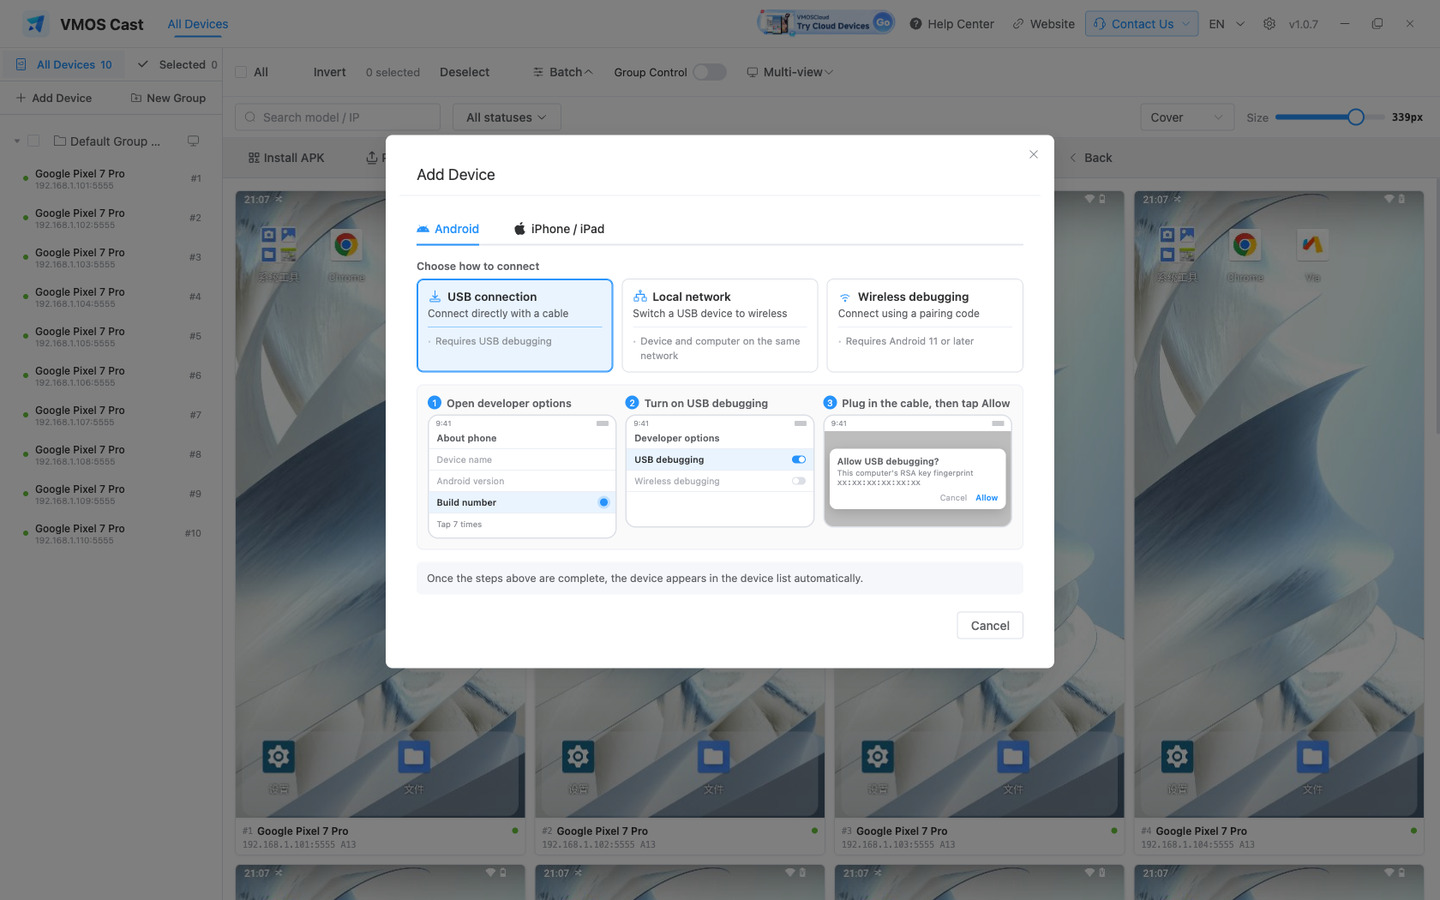
2.2 LAN connection
An Android phone connected over both USB and LAN keeps two cards, with control available in both focus windows. Screen power state is shared; closing one window does not close the other. Gestures from the two windows cannot interleave. When the serial number or cloud-device identifier matches, group-control targets and batch operations are deduplicated by physical device.
For cloud phones, and for physical phones that already have a network connection enabled, enter the address directly:
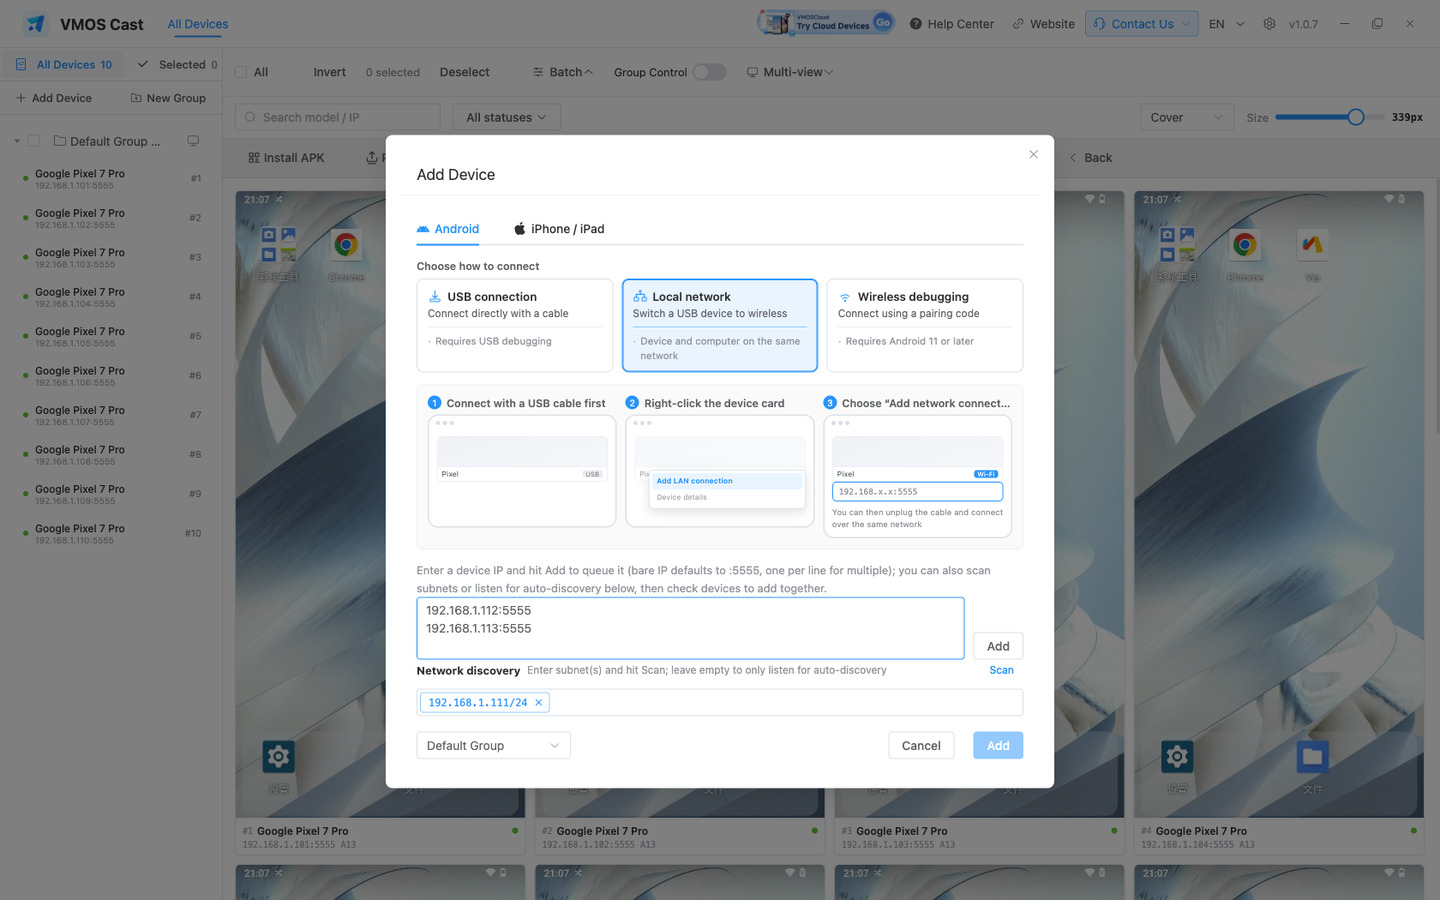
- Ports
1–65535are supported; an IP with no port is treated as5555. One address per line; commas also work - After Add is clicked, each address is probed: reachable entries are ticked automatically, no response entries (powered off or offline) cannot be added yet, and pairing required entries open the pairing flow when clicked
- The dialog footer selects a group, so new devices are filed on arrival
- Added addresses are saved and reconnect automatically on the next launch
2.3 Network discovery
When the IP is unknown, use Network discovery: enter a subnet and click Scan. Scanning with no subnet listens for device broadcasts only:
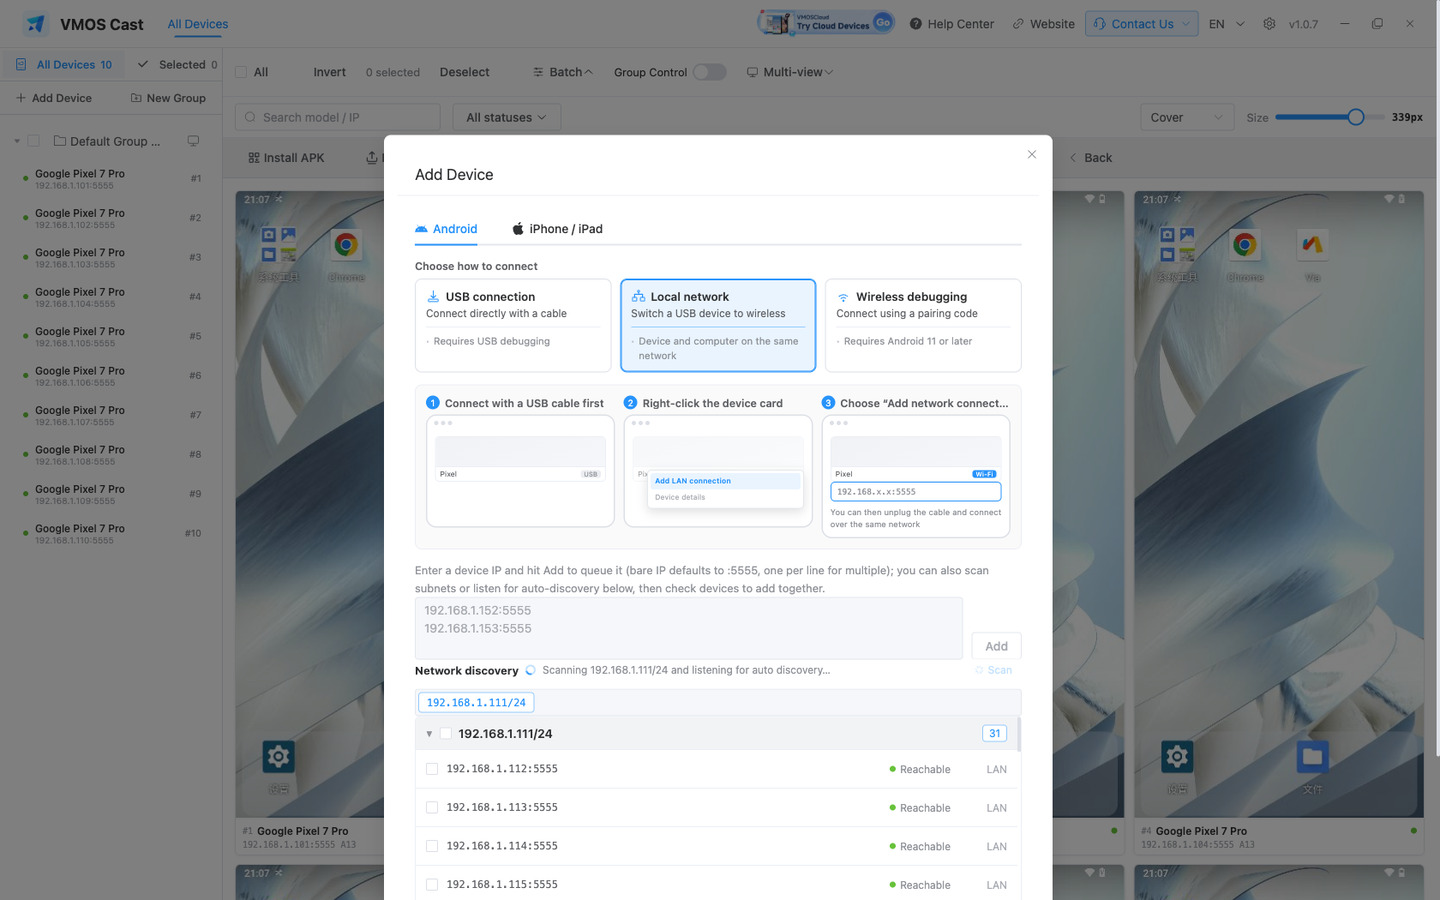
Results are grouped by source. Tick the required entries and add them together with any manually entered addresses. Devices already on the wall are marked as added and are not listed again.
2.4 Physical phones require a cable on first connection
A physical Android phone must be connected by cable the first time — network connections are disabled by default, so entering an IP alone will not work. Connect once by cable, enable the wireless connection, and the cable can be removed:
- On the phone, open Settings → About phone and tap Build number seven times to unlock developer options
- Settings → Developer options → USB debugging → on
- Connect the cable; when the phone asks "Allow USB debugging?", tick "Always allow" and accept
- In the app, right-click that USB device card → Add LAN connection
- Once the success message appears and the new card is online or showing a picture, remove the cable
The original USB card is not replaced — both cards remain on the wall.
When the phone reboots, a connection enabled through Add LAN connection is lost and has to be enabled over the cable again; a device paired through wireless debugging reconnects on its own. Cloud phones ship with it enabled and are unaffected.
2.5 Wireless debugging pairing (Android 11+)
The random port shown on the phone's Developer options → Wireless debugging page (for example 192.168.x.x:37xxx) uses an encrypted protocol that requires pairing. It differs from port 5555 and cannot be added as an ordinary address, but the app can complete the pairing:
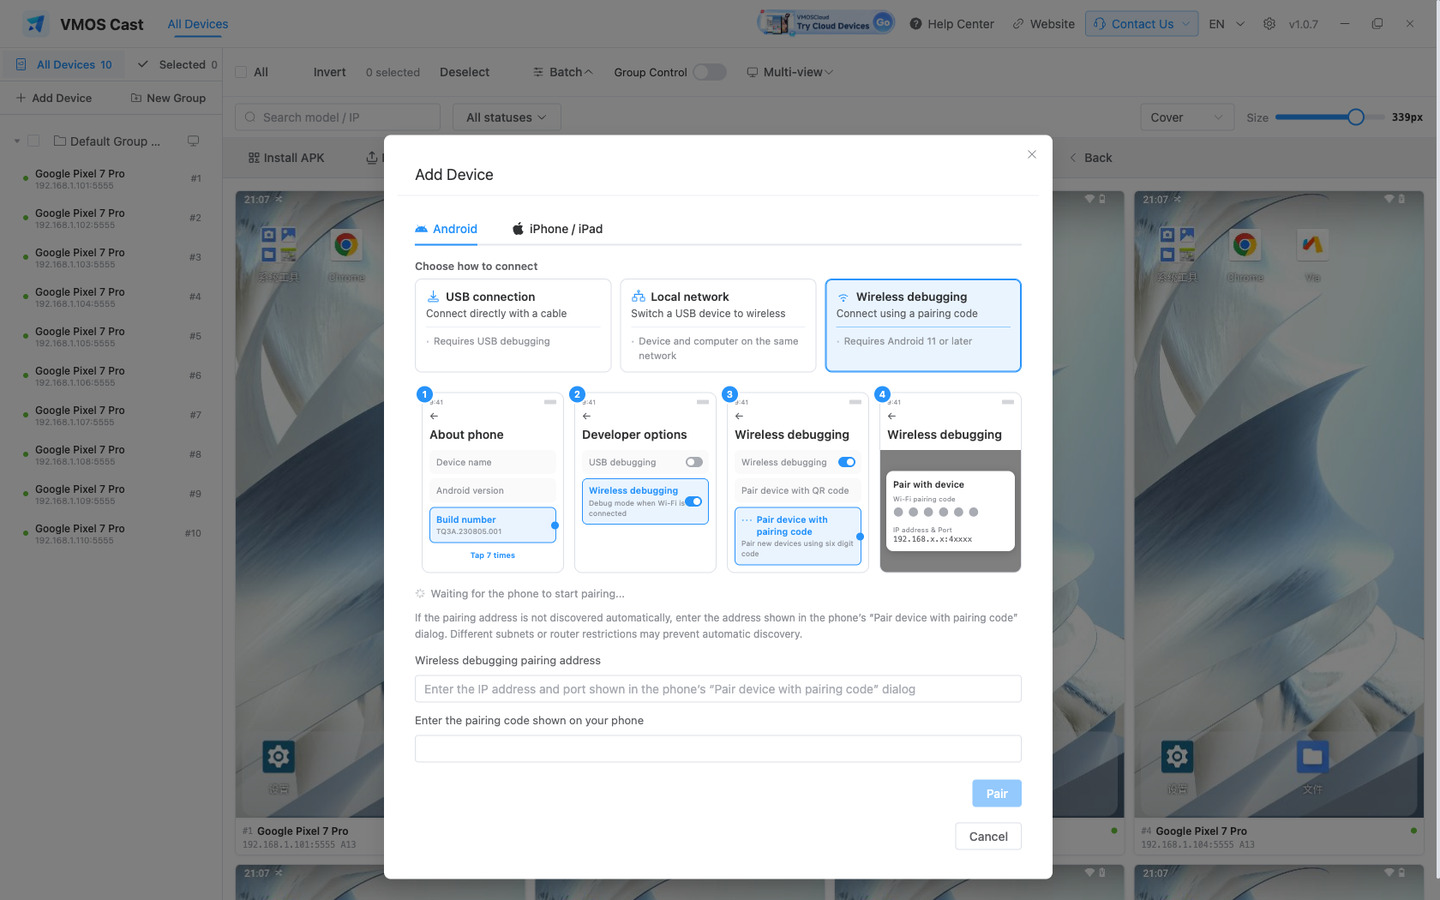
- Click the Wireless debugging card on the empty state, or click "pairing required" in the scan results
- On the phone, open Settings → Developer options → Wireless debugging → Pair device with pairing code and leave that dialog open
- On the computer, enter the
IP:portand the six-digit code from the phone's dialog, then click Pair - Close the dialog on the phone (leave wireless debugging on); the device joins the wall a few seconds later
Pairing is required once only; the device reconnects automatically on the same network afterwards.
2.6 iPhone / iPad
The independent iPhone display prioritizes the incoming source resolution instead of downscaling the relay for a smaller window. iPhone does not participate in multi-view; actual sharpness and smoothness still depend on the mirroring source, encoder, and computer load. Android's display quality and bitrate settings do not control iPhone mirroring.
Apple devices are not added, and there is no field for an iPhone's IP — the direction is reversed: the iPhone sends its screen to the computer.
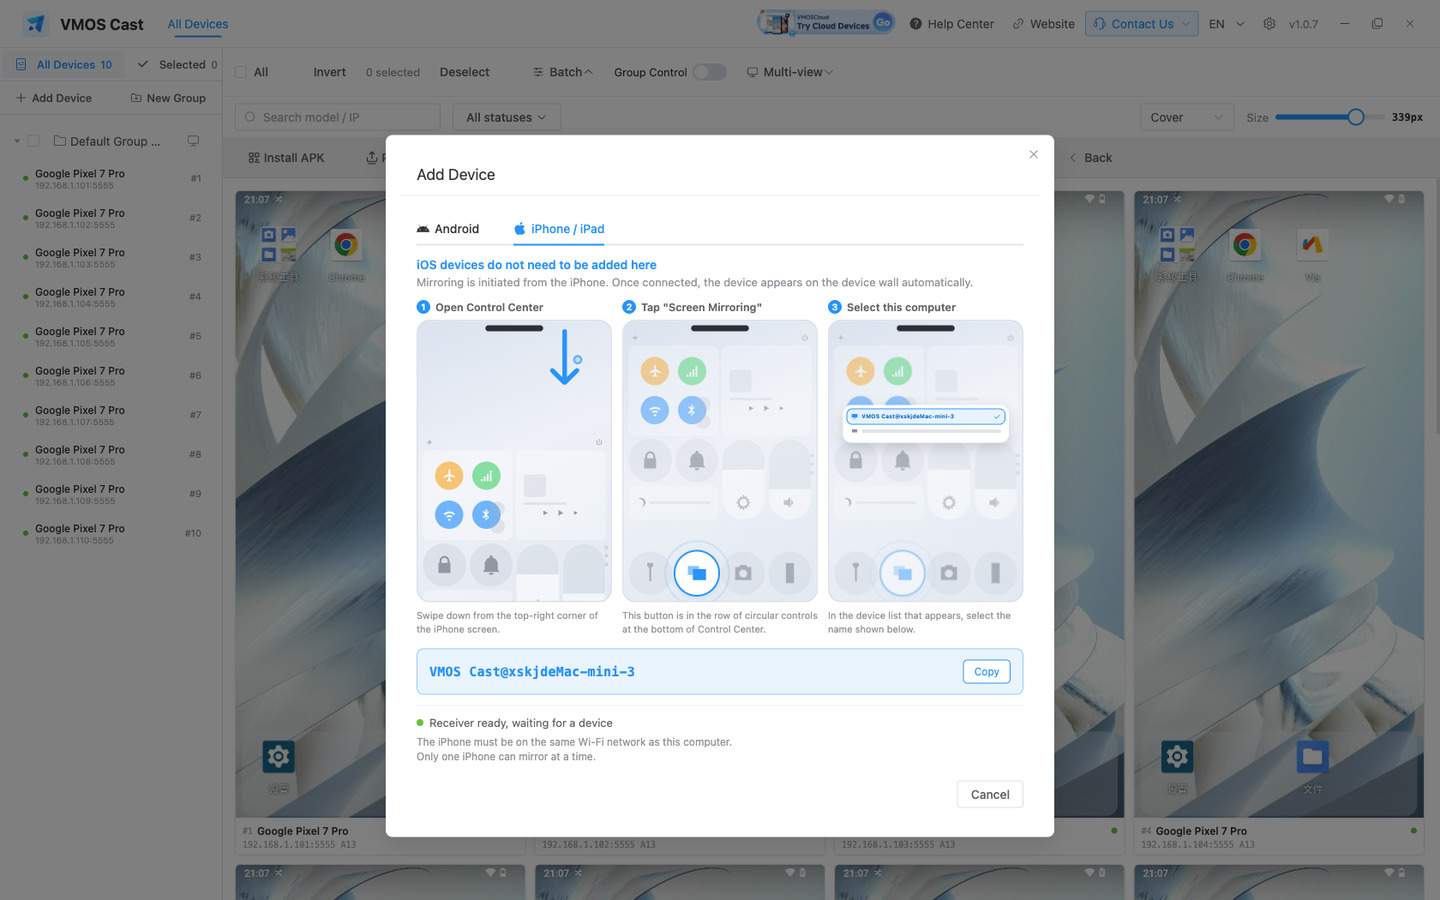
- Make sure the iPhone and the computer are on the same Wi-Fi
- In the app, switch to the Add Device → iPhone / iPad tab (the first visit turns the receiver on and remembers it)
- On the iPhone, swipe down from the top-right corner to open Control Center
- Tap Screen Mirroring (the two overlapping rectangles)
- Pick the computer name shown on that tab
iPhone / iPad support independent mirroring and management, without multi-view, Android group control or batch commands. Viewing does not require Bluetooth. On Windows and macOS, choose Enable control in the independent display and follow the illustrated pairing guide; Linux is view-only. Losing Bluetooth leaves mirroring running. Closing the display preserves wall thumbnails. Inactive records can still be selected, renamed, moved or removed. Configure Auto-Lock on the phone.
The current receiver accepts one live iPhone cast at a time; multi-view does not increase that limit.
Apple device capabilities depend on the desktop operating system:
3 The Device Wall
Managing iPhone / iPad records
Apple cards show a live preview while casting and return to the "Not casting" placeholder when casting stops. Both the sidebar and card show the reported model on the first line (iOS if unavailable) and the device name on the second. A custom client alias replaces the second line without changing the name on the phone. The Screen Mirroring device identifier remains in device details; it is not a hardware serial number. Previews reuse the video stream already received on the computer, without starting another cast on the phone, and continue while casting even after the focus window closes.
After the first Screen Mirroring connection, an iPhone or iPad appears in both the device wall and sidebar and is included in group and total counts. Its record remains after casting stops, marked "Not casting"; this does not confirm that the device is online or controllable.
Click the name area below the card or its sidebar row to select it. Selection, search and moving between groups are supported. Right-click an Apple card to rename its client-side alias, view available device information, move it to a group or remove the record. Names and groups survive application restarts. Removing a record does not shut down the phone or stop an active cast; starting a new cast can add it again.
Click an active casting area to open its focus window. When not casting, a Screen Mirroring guide appears instead of an empty focus window. Selecting an Apple device enables management only, not Android batch operations or group control.
3.1 Selecting devices
Click anywhere on a card outside the picture to select it; the whole card gains a blue border. Clicking a row in the sidebar does the same, and the two stay in sync:
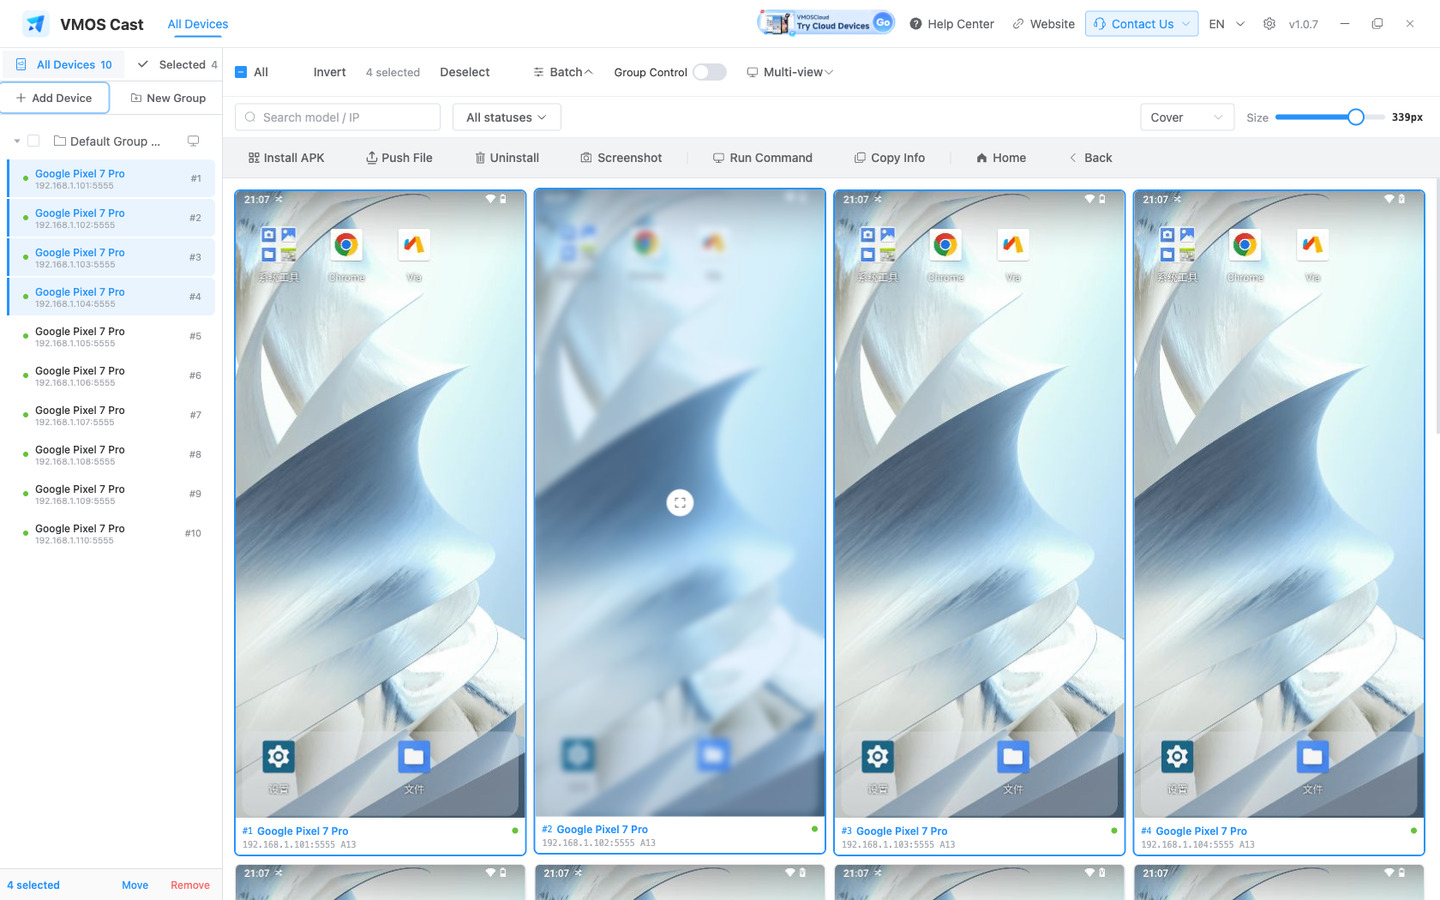
Select All and Invert apply only to the devices visible after filtering. Scale offers centre-crop, fit-whole and fit-width; the window size slider resizes cards live — resizing rebuilds the wall pictures only and never drops an open focus window.
3.2 Right-click menu
Right-click a device card:
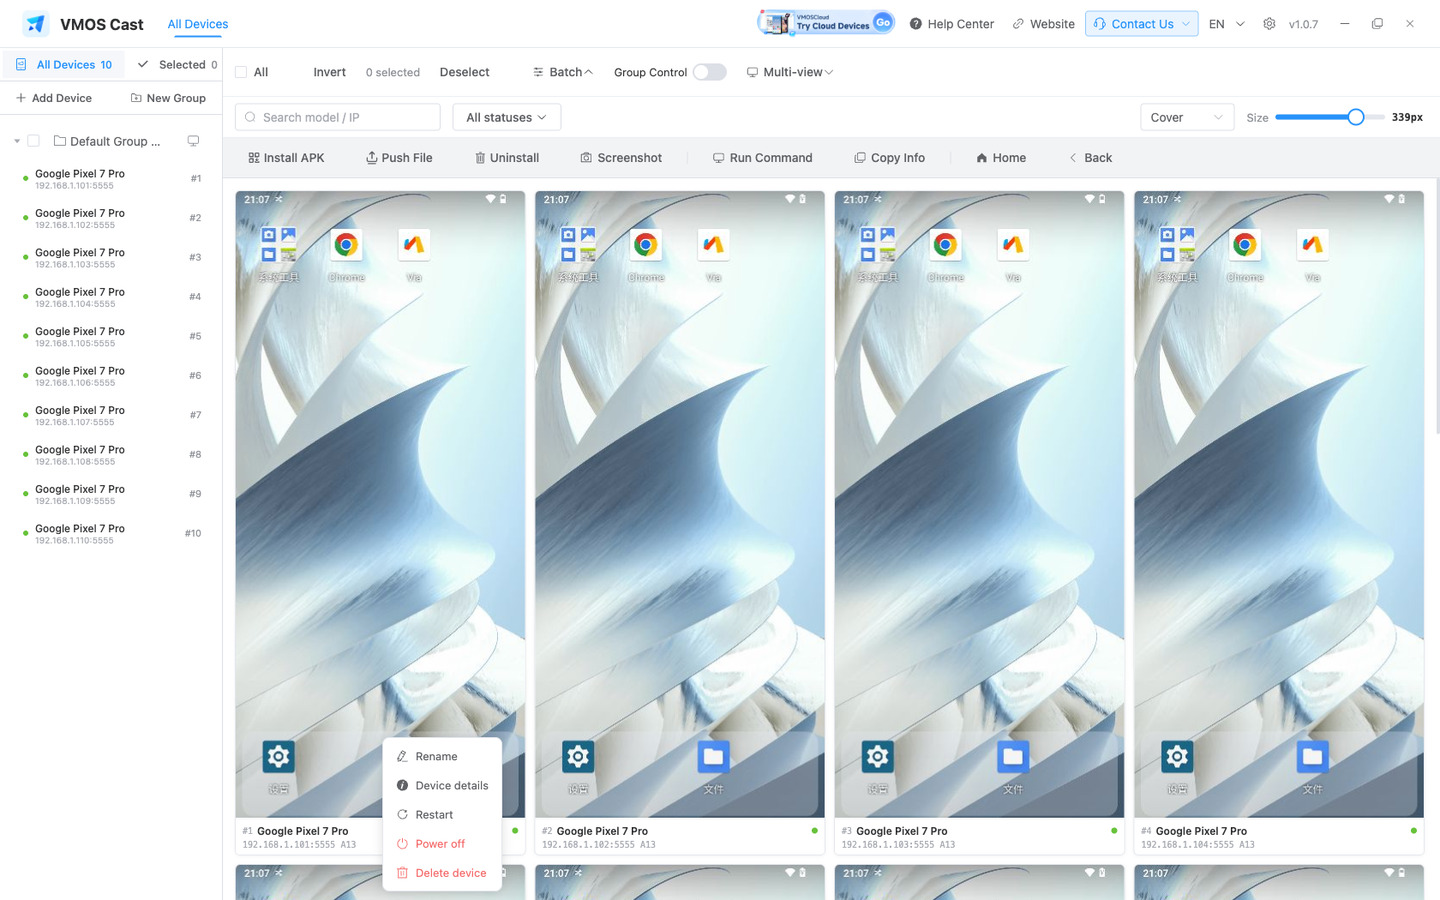
| Item | What it does |
|---|---|
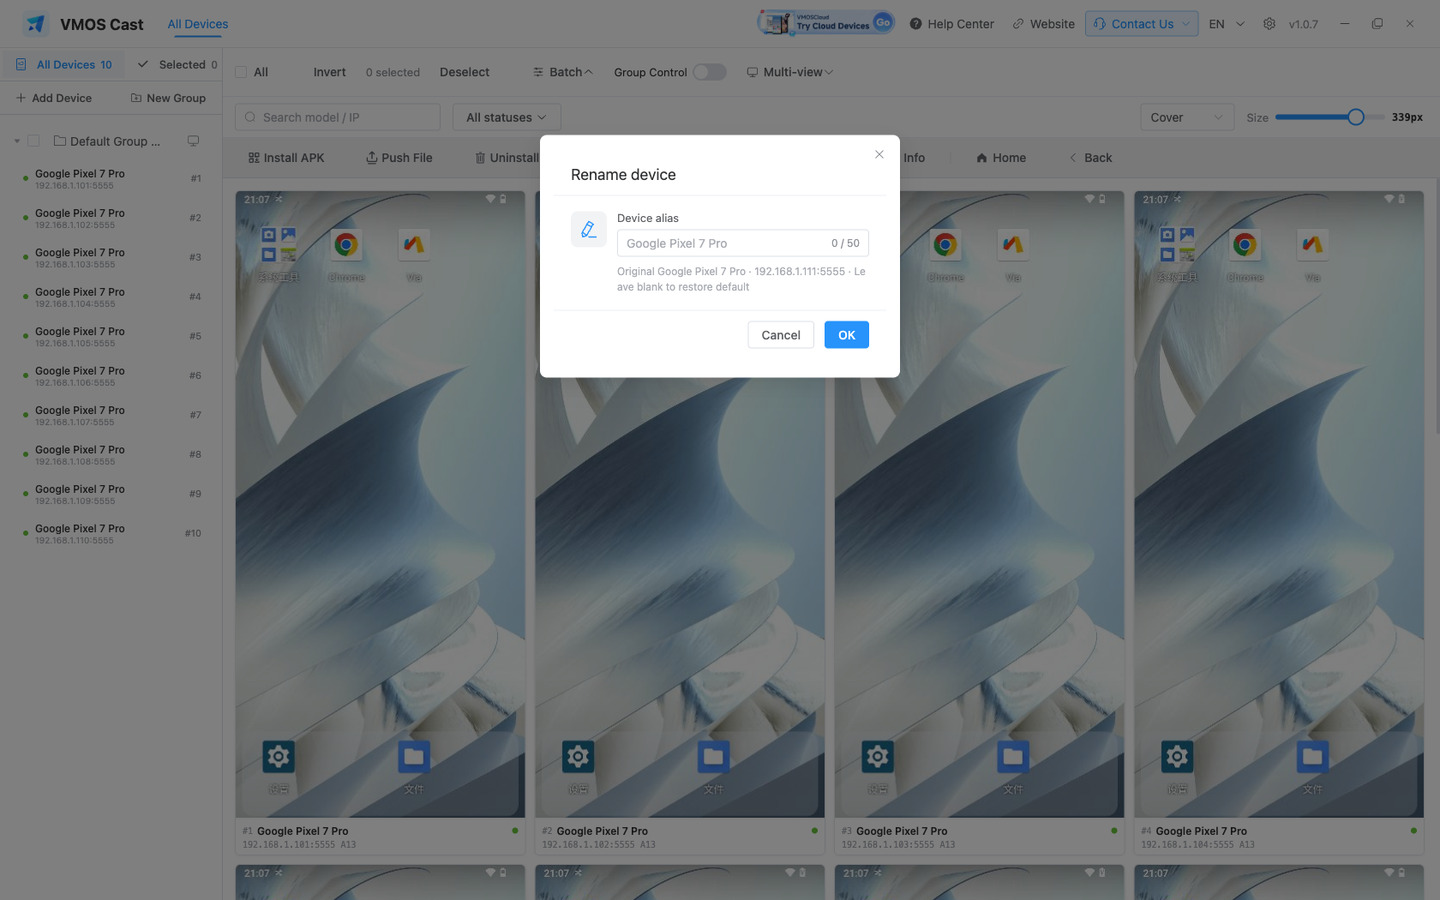
| Rename | Give the device an alias; leave blank to restore the default name |
| Device details | See 3.3 |
| Add LAN connection | USB devices only — converts the USB connection to wireless |
| Delete device | LAN devices only; also clears the saved address so it will not reconnect next launch |
| Reboot | Streaming stops and reconnects automatically once the device is back, usually within a minute |
| Shut down | The device cannot be powered on again remotely — the power button has to be pressed on the device itself |
Reboot and Shut down are disabled while a device is offline. If the card reads "Connection failed", wait for it to recover before using them.
3.3 Device details
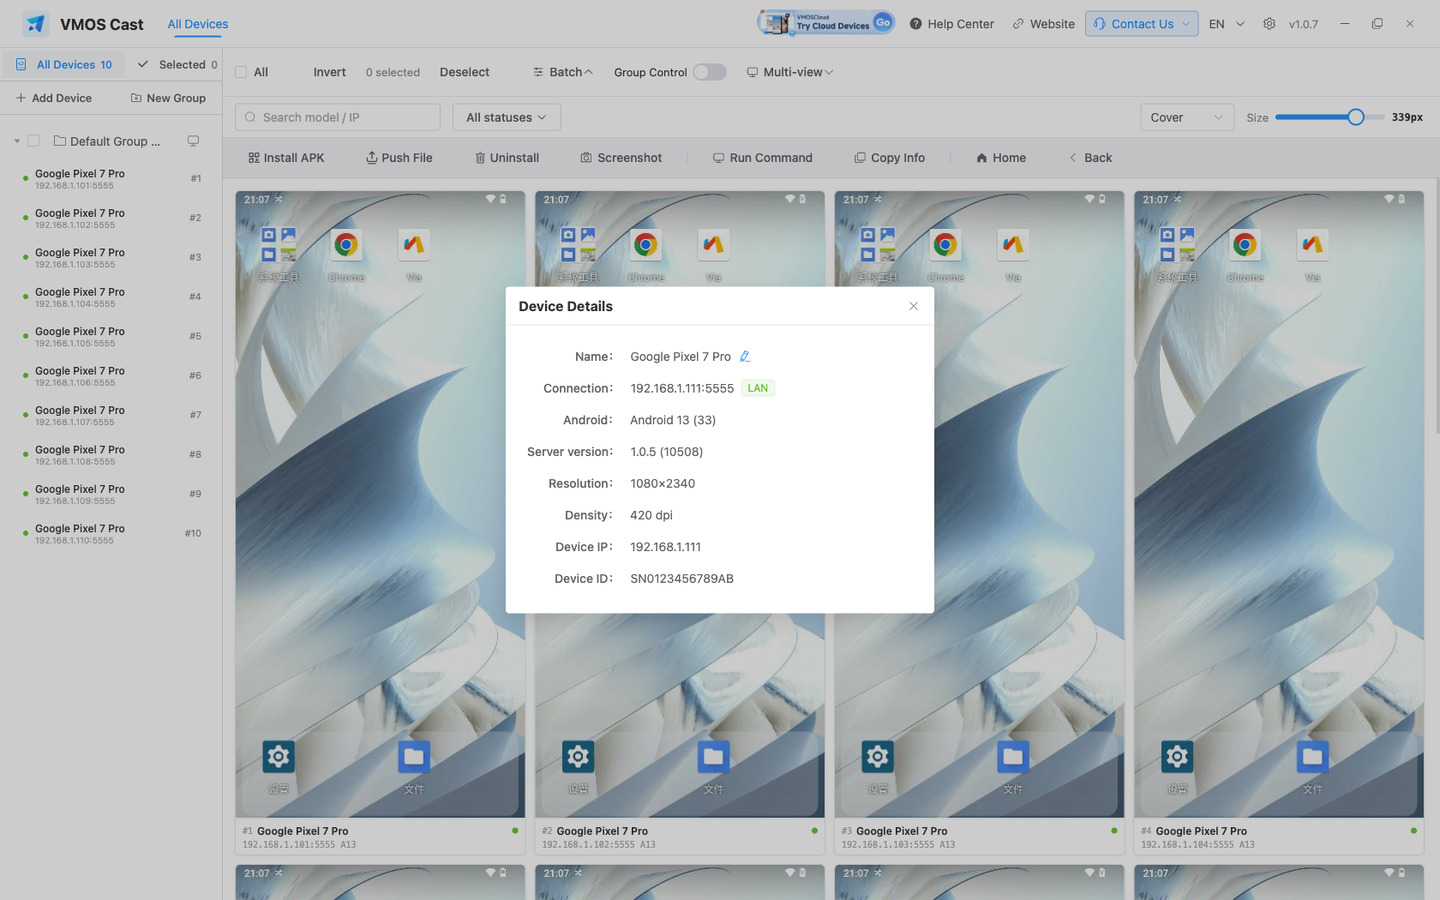
Click any value to copy it; the raw JSON can be copied as well. When a newer device-side version is available, an Update button appears: the app first confirms the device is not in use by another focus window or another computer, and never interrupts a picture that is being watched in order to update.
3.4 Rename
3.5 Search and status filter
The search box on the right of the toolbar filters by model or IP while typing. Next to it, Status is a multi-select dropdown, and every entry carries a live count:
Online · Connecting · Screen off · Not castable · Failed · Offline
Statuses combine with OR, and the filter as a whole combines with search and groups using AND. Counts are computed over the set already narrowed by search and group, so the number in the dropdown is exactly the number of cards shown. The status filter is not saved: status is momentary, and reopening the app still restricted to "offline only" would suggest the devices had been lost.
4 Groups
Select devices, then click New Group in the sidebar:
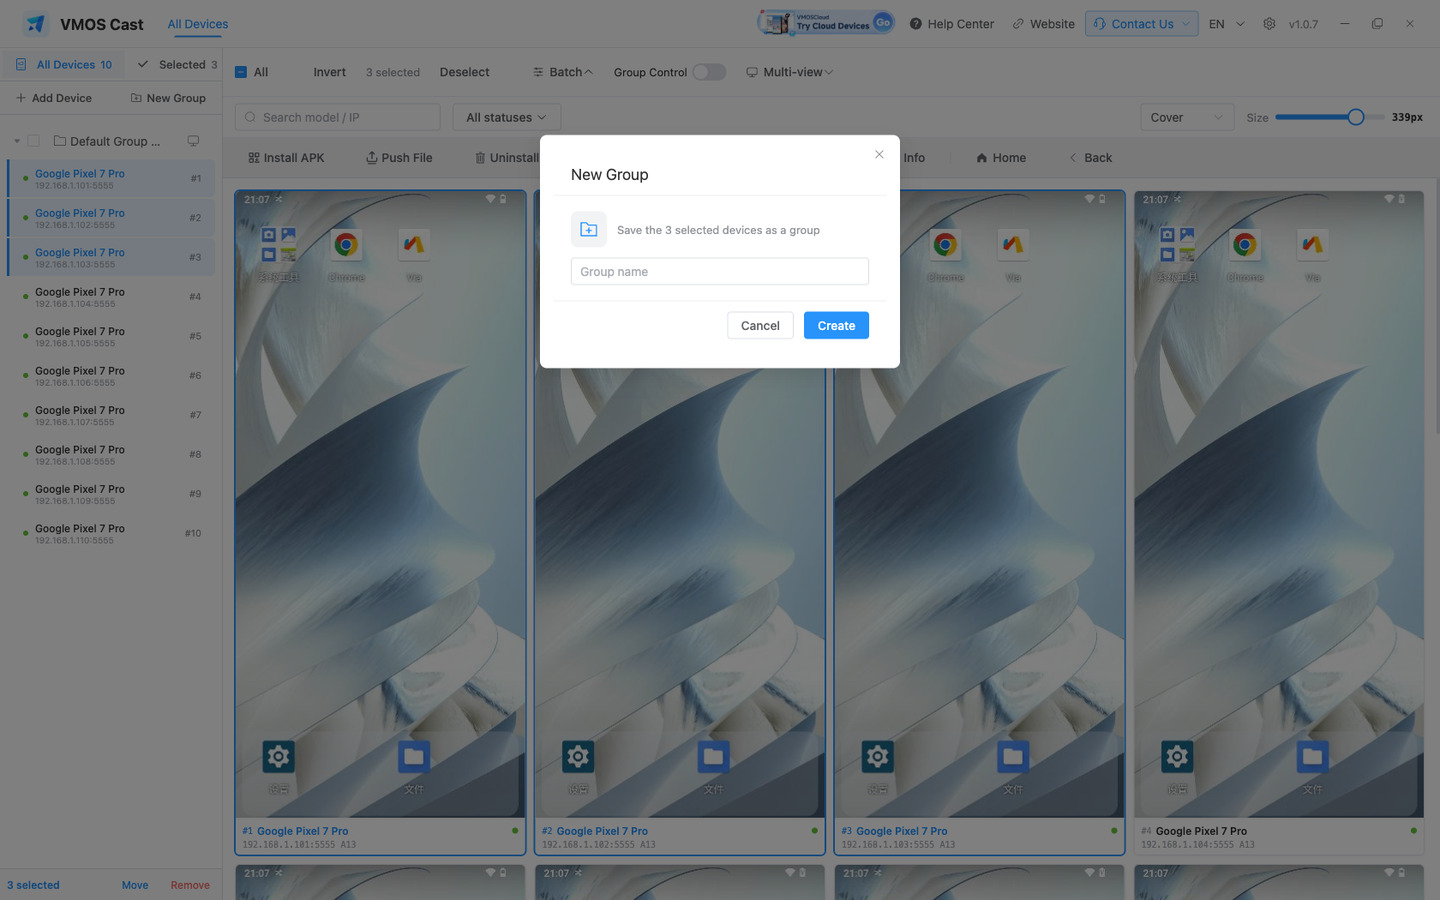
- Click a group name to show only that group; click it again (or All devices) to return
- Move to Group moves the selection into another group, and can create one in the same step
- Deleting a group moves its devices to the default group — it never deletes or disconnects them
Groups and search filter the display only; pictures keep running. Multi-view follows groups — changing a group's members changes the multi-view.
5 Batch Operations
Select devices and click Batch in the toolbar:
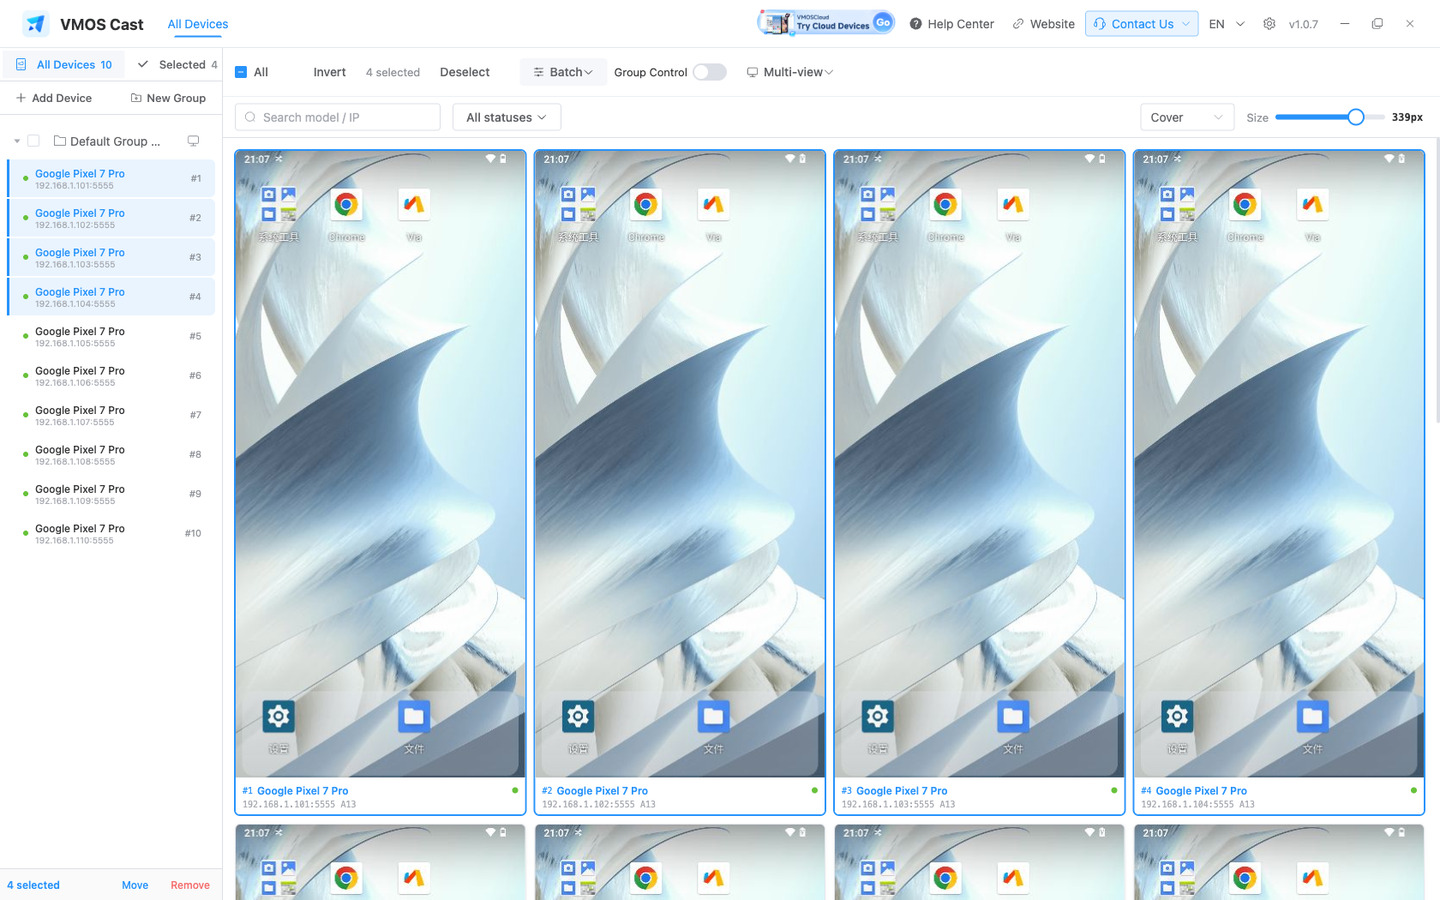
Results are returned device by device. Every selected device is acted on and none are silently skipped; a device that cannot be reached reports an explicit failure and reason.
5.1 Batch install
Supports apk / apks / apkm / xapk; drag files in or click to upload. Multiple files are queued:
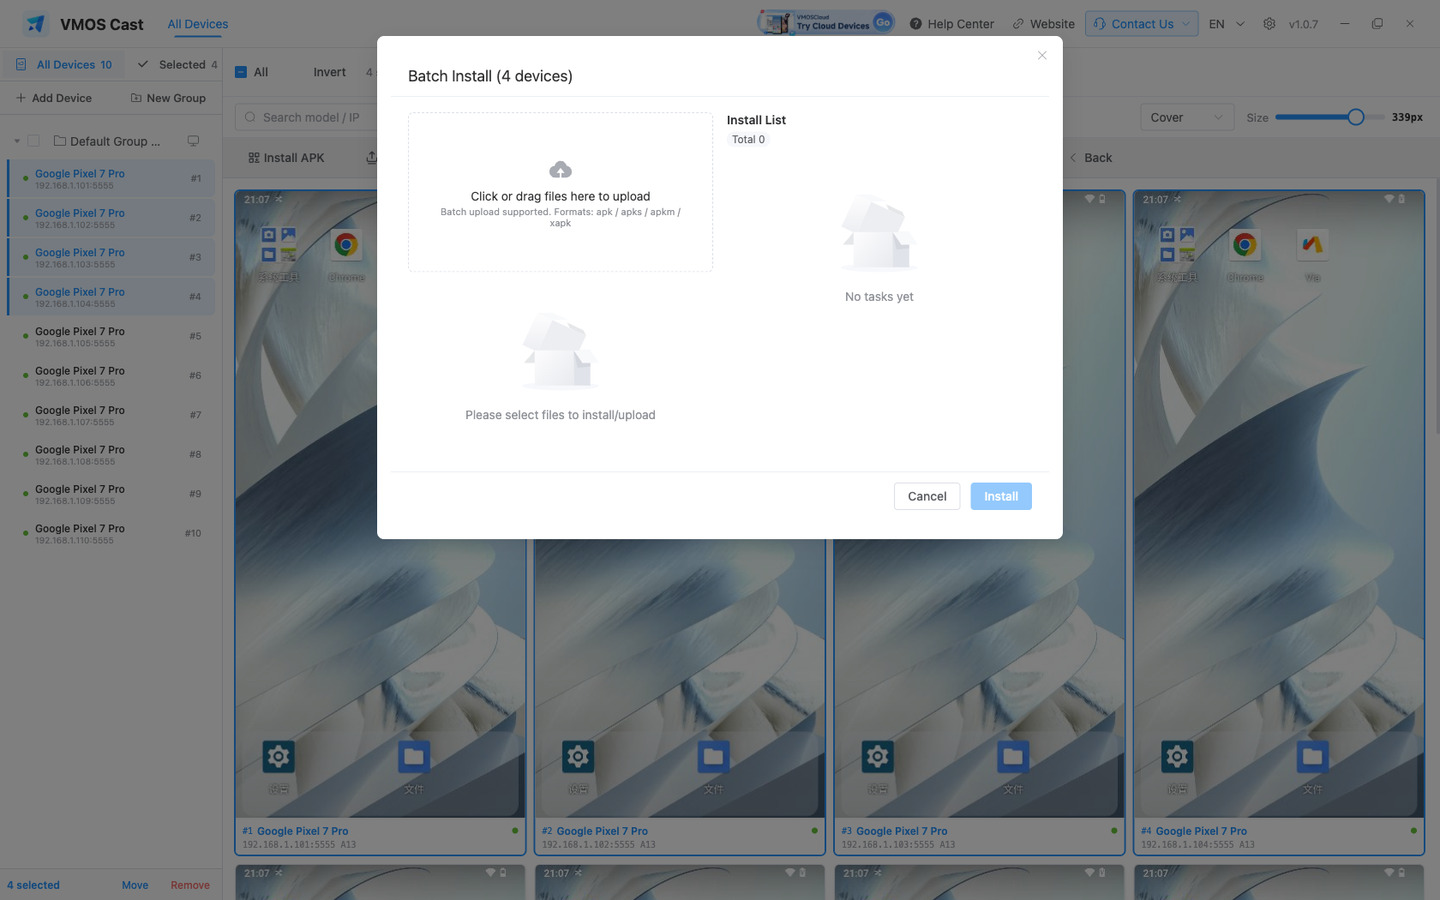
An older installed version is overwritten with the selected version (application data is kept when the signature matches).
5.2 Batch uninstall
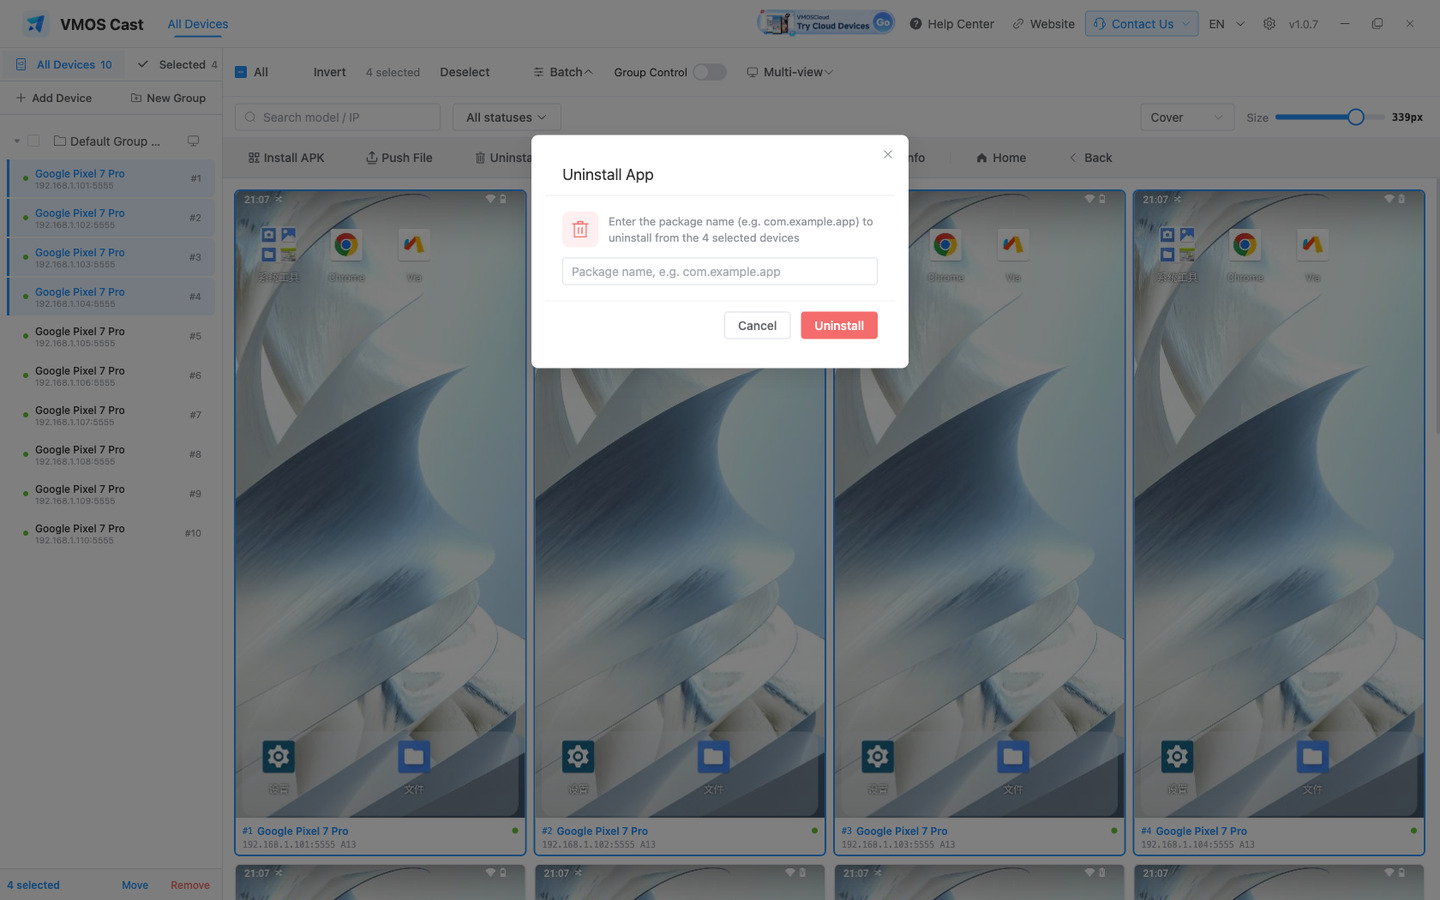
Batch uninstall cannot be undone. Confirm the package name and verify on one or two devices before running it on the whole group.
5.3 Run Command
Runs on all selected devices in parallel, with built-in templates in three categories; one click fills in the command:
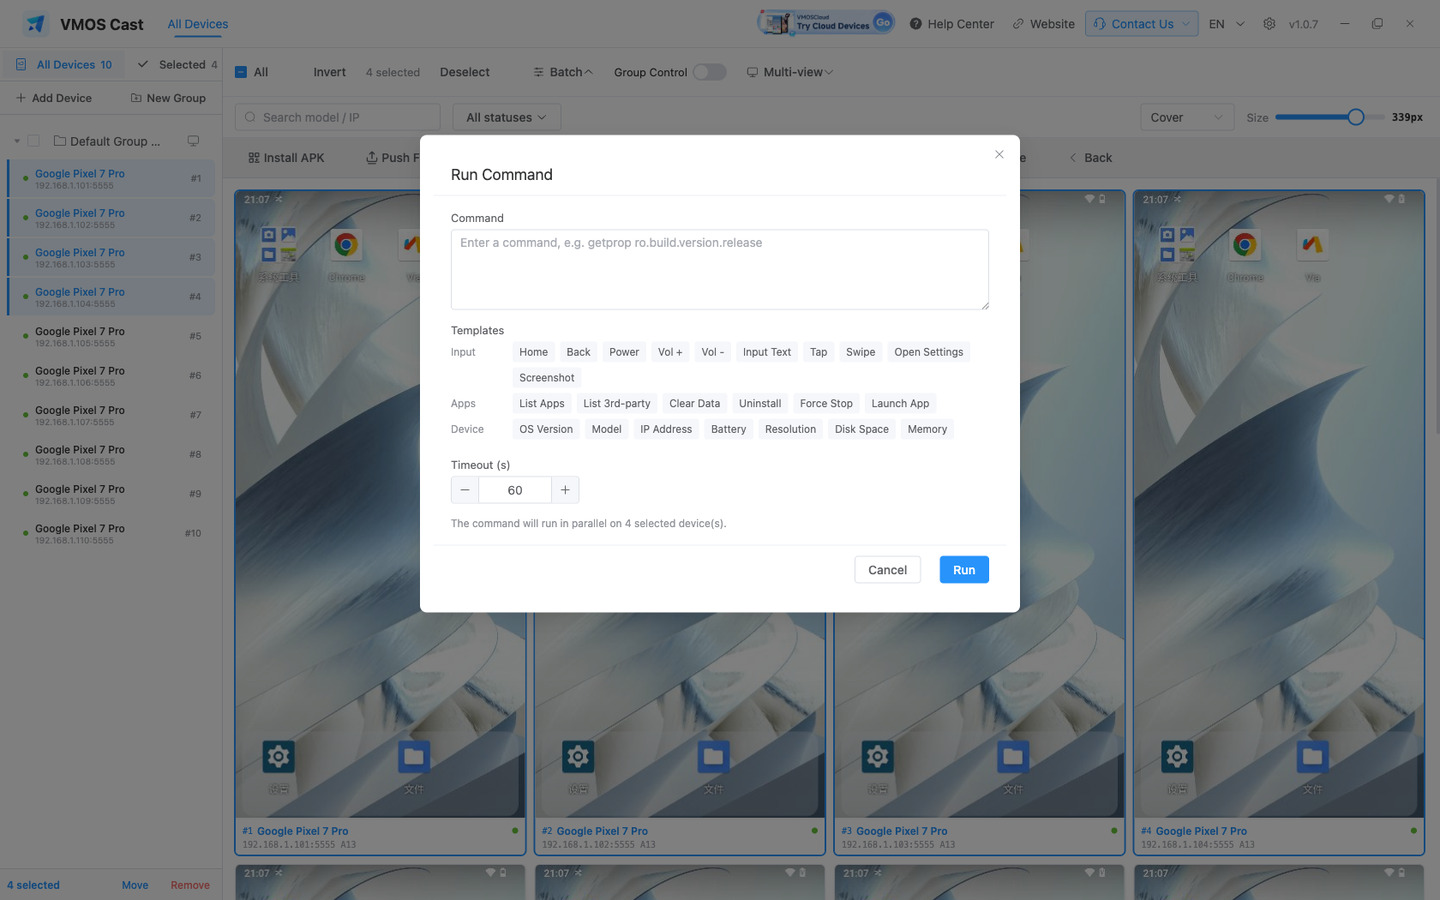
Offline devices are excluded automatically with a notice. When the run finishes, success, failure and output are listed per device, and the run can be repeated.
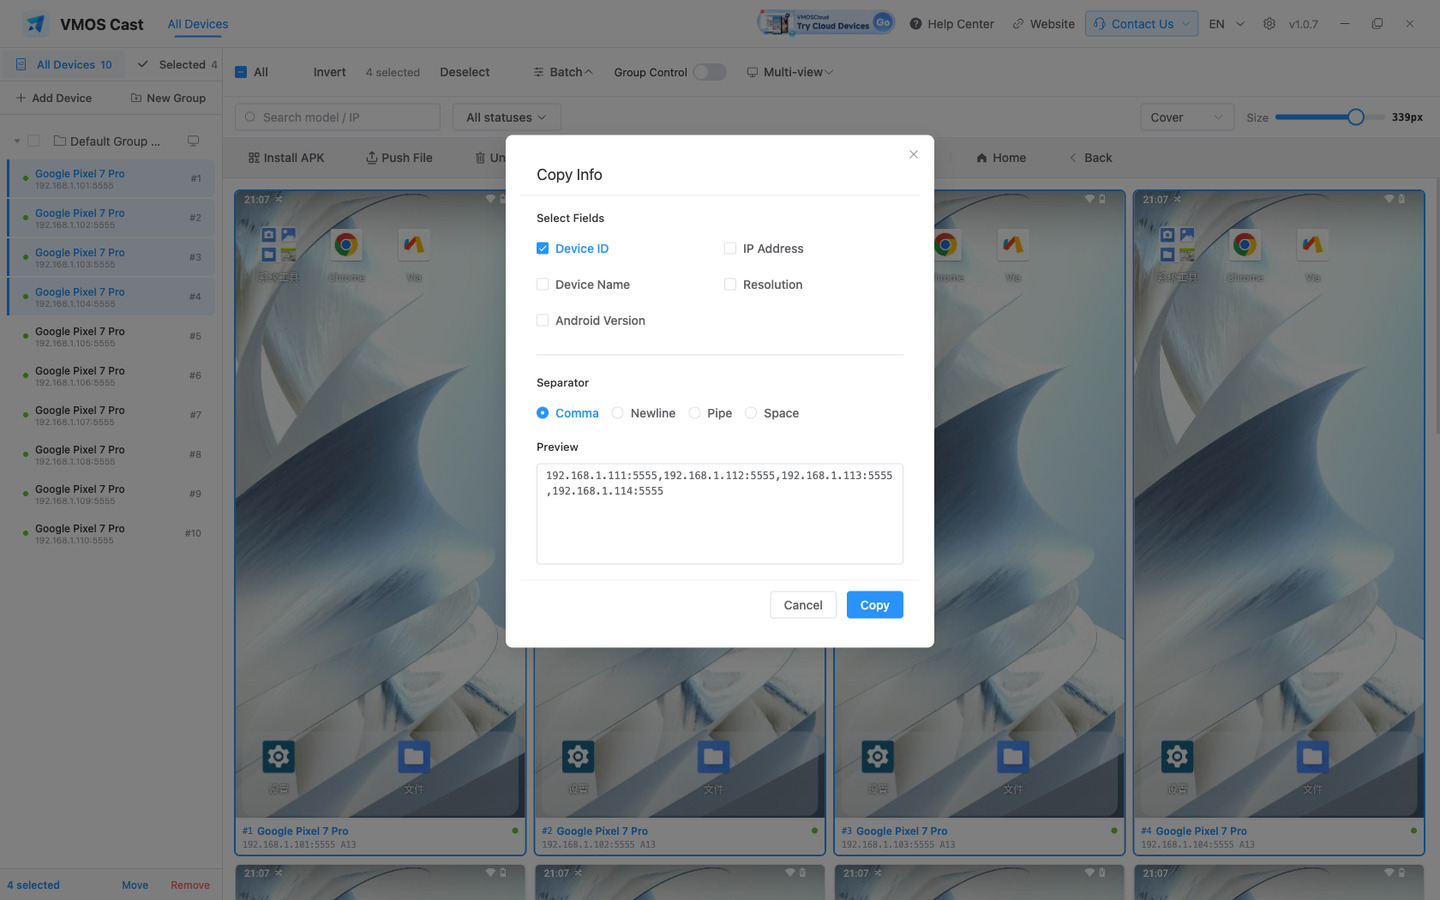
5.4 Copy Info
Copies information about the selected devices as text in a single step, for records or spreadsheets:
5.5 Push files
Files are placed in /sdcard/Download on the device — "My Files → Internal storage → Download" on the phone. They are registered with the system media store automatically, so they appear in Downloads immediately, and each device reports the path the file was written to.
5.6 Batch screenshot
Batch screenshots and the Shot button in the focus window toolbar save to the same location: Settings → Streaming Settings → Screenshot location. The file is written on click, with no save dialog.
- Default location:
VMOS Castinside the computer's Pictures folder (created on the first screenshot) - File names include the device name and timestamp (for example
Pixel 7 Pro-20260827-161105.jpg), so files never overwrite each other - After a batch: "Saved N/M screenshots" plus the full folder path
- With nothing selected: a prompt to select devices first
- A device that fails is listed by name · usually because its screen is off, or it is on a page that blocks screen capture
- "Screenshot folder is not writable": the folder was deleted or moved, or its location is not writable · select another folder in Settings
6 Group Control
Batch operations synchronise actions. To synchronise gestures — taps, swipes and drags across several devices:
- Select two or more devices that are already showing a picture
- Click Group Control in the toolbar
- The first device opens as the master, with "Group Control · syncing N devices" at the top
- Every tap, swipe and drag in the master window is mirrored to the other selected devices in real time
Group control synchronises gestures on the picture only. Keyboard input reaches the master device and is not forwarded to the followers; to perform the same operation across a set of devices, use batch operations.
7 Focus Window
Click a device's picture to open a dedicated high-definition window; the wall behind it remains visible:
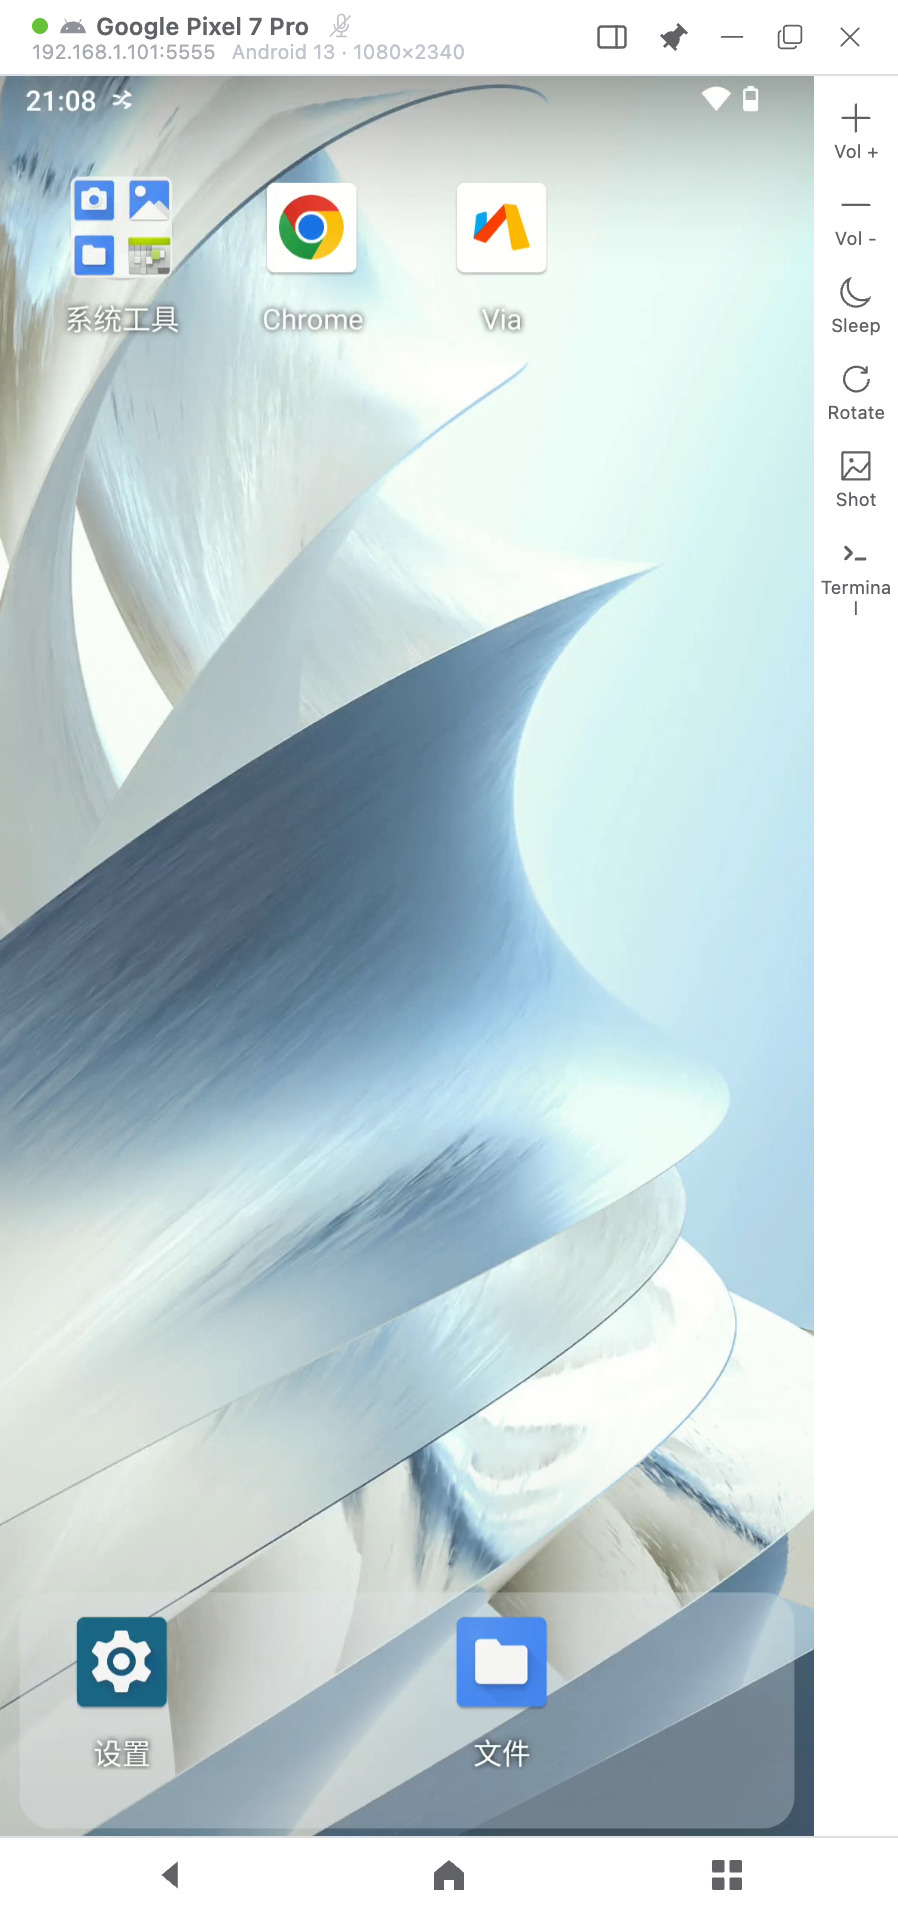
The title bar shows the device name and ID (click to copy), preceded by a platform icon (Apple / Android). Top right: pin, minimise, maximise, close, and a button that switches the window style.
click · drag · wheel · keyboard
| Input | Effect |
|---|---|
| Click | Tap the device screen |
| Click and drag | Swipe or drag |
| Scroll wheel | Scroll inside the device |
| Right / middle click | Back / Home while awake; wake while the screen is off |
| Keyboard | Sends text or keys to the focused field; IME input is supported, with active Pinyin shown at the bottom of the mirrored screen |
| Bottom row | Back / Home / Recents |
Esc | Close the window (the wall connection stays up) |
The right-hand toolbar holds volume up/down, screen off / wake (following the device's current state), rotate, screenshot, Terminal and Quality. Quick replies appears when WeChat is foreground and its plugin is enabled. Only one of Terminal, Quality or Quick replies is expanded at a time. The window extends to the right to preserve the phone picture; switching tools does not add more panels.
Quality for this display: Original is the default, bounded by local hardware decoding. You can choose Smooth, Balanced, Clear (1920 px), or Custom. The long-edge choices are Original / 720 / 1280 / 1920 pixels; FPS choices are Match device / 15 / 30 / 60; bitrate choices are 1 / 2 / 4 / 8 / 12 Mbps. The Original preset also restores Full Screen FPS and Bitrate from Settings; other presets explicitly override these values. Applying rebuilds only this focus window's video session, not global defaults or multi-view panes. Failed changes attempt to restore the previous configuration. The panel shows actual video dimensions and applied limits; FPS and bitrate are not live measurements.
On an iPhone the toolbar holds only Control, and the navigation keys at the bottom are not shown — those are Android system keys and do not apply to an iPhone.
The window matches the picture's aspect ratio and scales proportionally when its edges are dragged, so the picture is never stretched.
Three window styles (Settings → Cast window → Focus window, applied the next time a focus window is opened):
The button in the title bar switches the current window only, without changing the default.
Terminal panel: the Terminal button opens a command line for that device (a standard 80 columns wide) and widens the window so the picture is not covered.
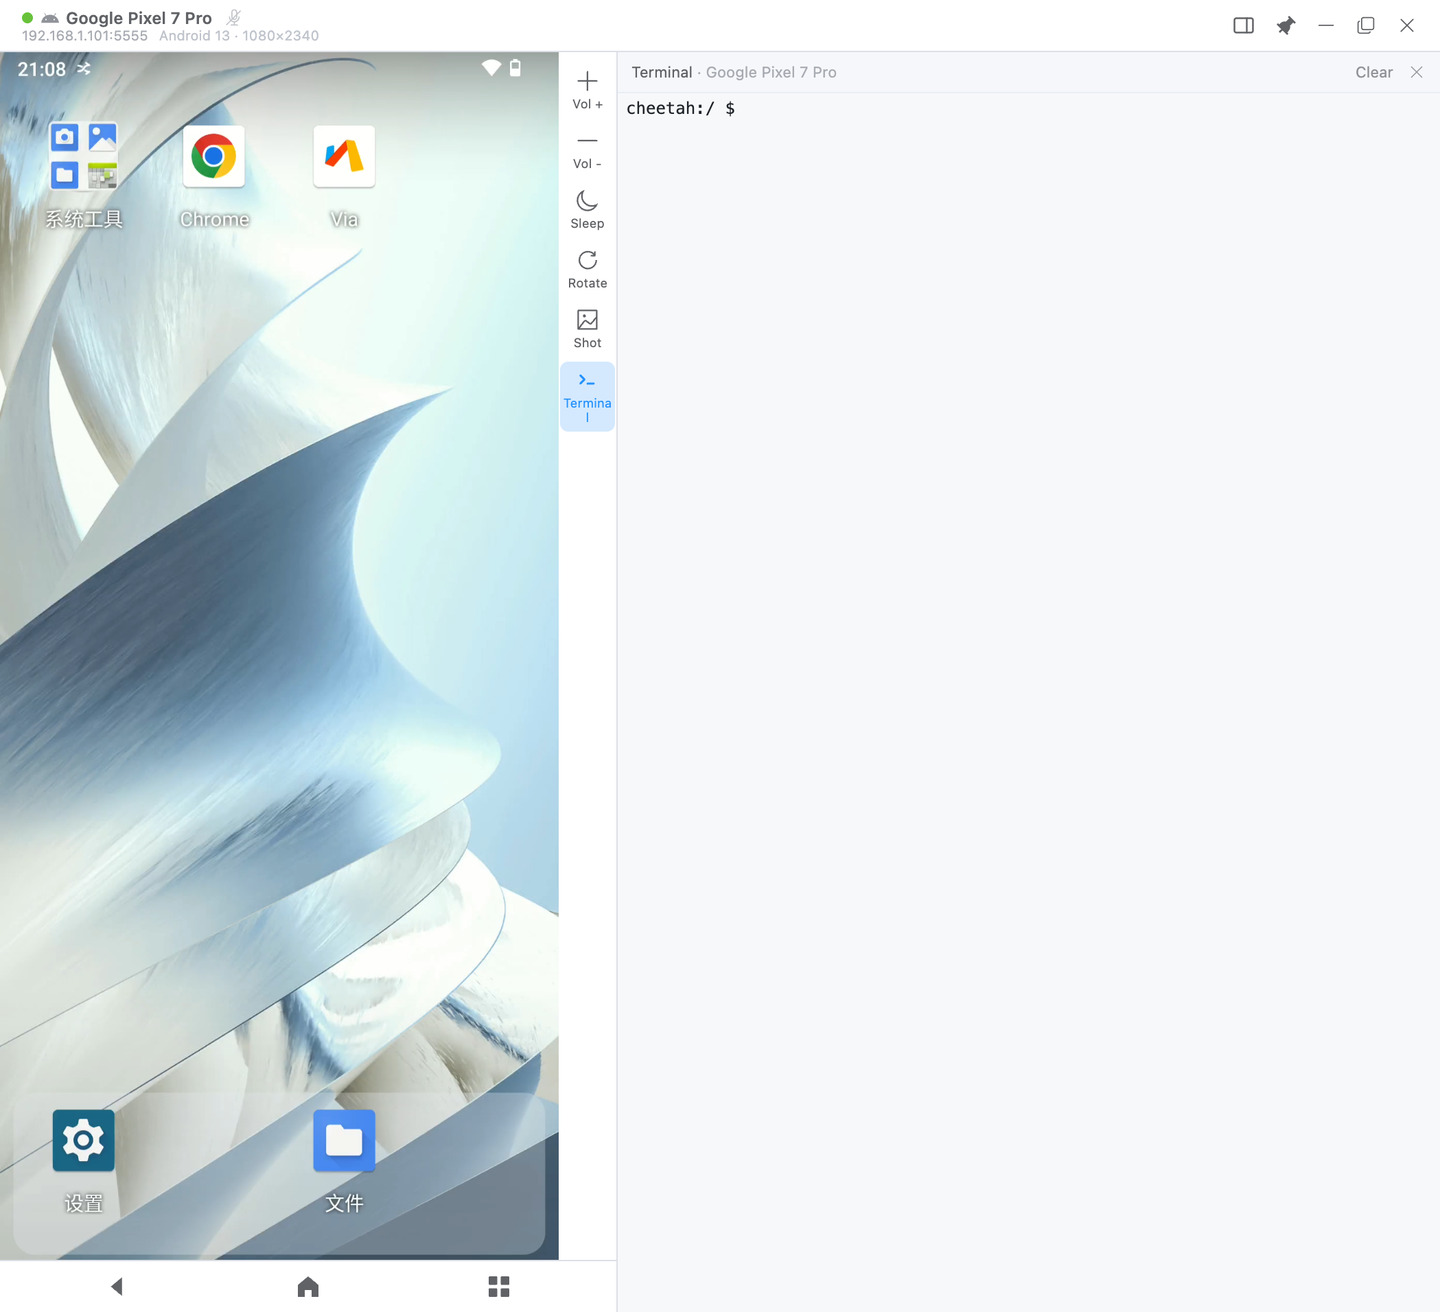 Select text and press
 Cmd+C (Ctrl+Shift+C on Windows / Linux) to copy to the computer clipboard; Ctrl+C still interrupts the running command.
Focus-open badge: devices with an open focus window show a small screen icon in the top-left of their card. Clicking that device's picture again brings the existing window to the front rather than opening a second one.
8 Multi-view
To view every device in a group in a single window, click the monitor icon on the right of a group row in the sidebar, or select the group from the Multi-view dropdown in the toolbar:
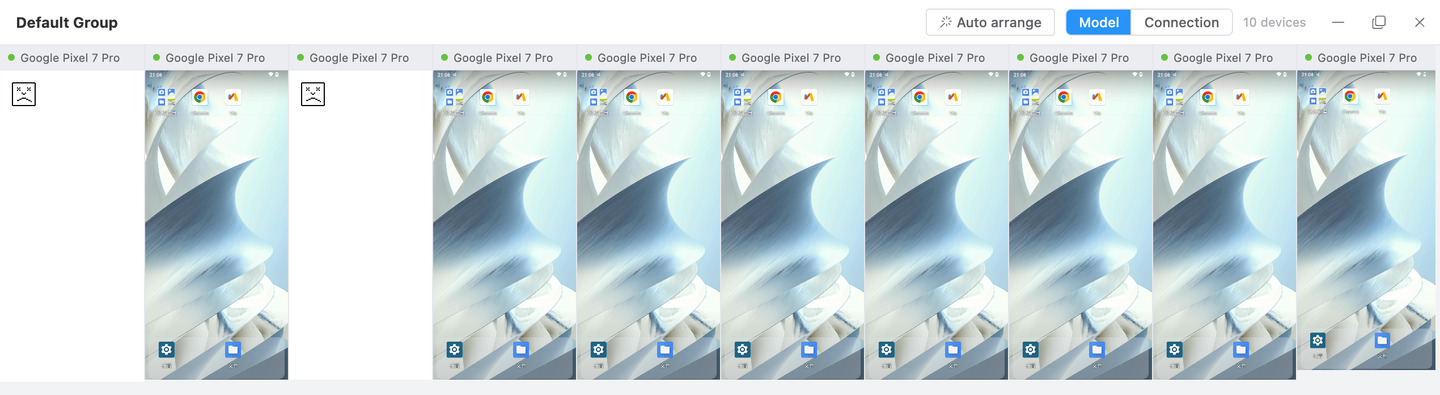
- Every pane is directly clickable. Auto arrange considers both workspace width and height, using each picture's actual aspect ratio for portrait, landscape and mixed layouts, ordered left to right and then top to bottom. It prioritises fitting every device fully inside the visible area, scaling panes down and allowing unused space instead of cropping pictures to fill the window
- Android panes request the device's original picture by default. Resizing a pane changes only its display size, not the source resolution. With many devices, lower Full Screen FPS or Bitrate in Settings to reduce load
- Quick replies are available only in the Android single-device window toolbar, not in Multi-view.
- Drag a pane by its title bar. Slight contact leaves other panes still. A target swaps into the drag-start position only when more than half covered and both panes fit without overlap. Otherwise positions stay unchanged; panes are not pushed down or globally rearranged
- The × on a pane's title bar removes it for this session; the expand button opens that device in its own focus window
- Pane titles can show either the model name or the connection name. Auto arrange is enabled by default and continuously responds to window and device-orientation changes. Dragging or resizing a pane enters manual layout; click Auto arrange to restore automatic control
- Clicking empty workspace or switching to another window clears the active pane. On Windows, clicking the window title or the empty part of its title bar also clears selection while preserving native window dragging. On macOS, use empty workspace, switch windows or drag the window; a title-bar click without dragging is not covered
TIP
Scrolling the wheel inside a pane scrolls that device. When the layout is taller than the window, use the scrollbar on the right.
9 Controlling an iPhone
Windows and macOS provide direct Bluetooth touch without locking the computer pointer; Linux is view-only. Compatible Bluetooth hardware is required. Mirroring and control are separate: a visible picture does not mean pairing is complete.
After control is enabled, closing the independent display releases held input without deliberately disconnecting Bluetooth. Reopening can reuse the connection if it remains connected. Stop control or exit the client to shut down the control service.
9.1 Set up control
- Choose Enable control beside the independent display. Follow the illustrated guide to open Bluetooth settings on the phone and select the displayed device name.
- Verify and accept any pairing prompts. A valid pairing can reconnect without deleting it every time.
- Enable Settings › Accessibility › Zoom, choose Full Screen Zoom and turn the Zoom Controller off. If magnified, double-tap with three fingers to restore normal size while leaving Zoom enabled.
- Test a tap in a safe location and confirm the phone responds. Closing the guide does not stop mirroring.
9.2 Controls
| Action | Method |
|---|---|
| Tap | Left-click the target in the picture |
| Drag | Hold the left button, move, then release |
| Vertical scrolling | Use the vertical wheel or drag |
| App Switcher | Drag up from the bottom-center to the middle, pause, then release |
| Keyboard | Focus the phone input first; use an English computer input source |
Leaving the window releases contacts and keys. Use the phone input method for Chinese. Computer Chinese composition or paste, landscape, multi-touch, hover, horizontal wheel, iOS group control, app installation and file transfer are not supported. Gesture behavior depends on phone system and accessibility settings. This is not USB control.
9.3 Troubleshooting
- Confirm the picture is live. If frozen, stop Screen Mirroring on the phone and reconnect before clicking.
- Check Bluetooth, keep Zoom enabled at normal picture size and complete the guide's tap verification.
- If the computer cannot be discovered, check its Bluetooth permissions and switch, then reopen setup.
- Forget an old pairing only when it has actually become invalid or reports unsupported, then pair again.
10 Settings
Click the gear icon in the top bar. Settings are split into Appearance and Cast window:
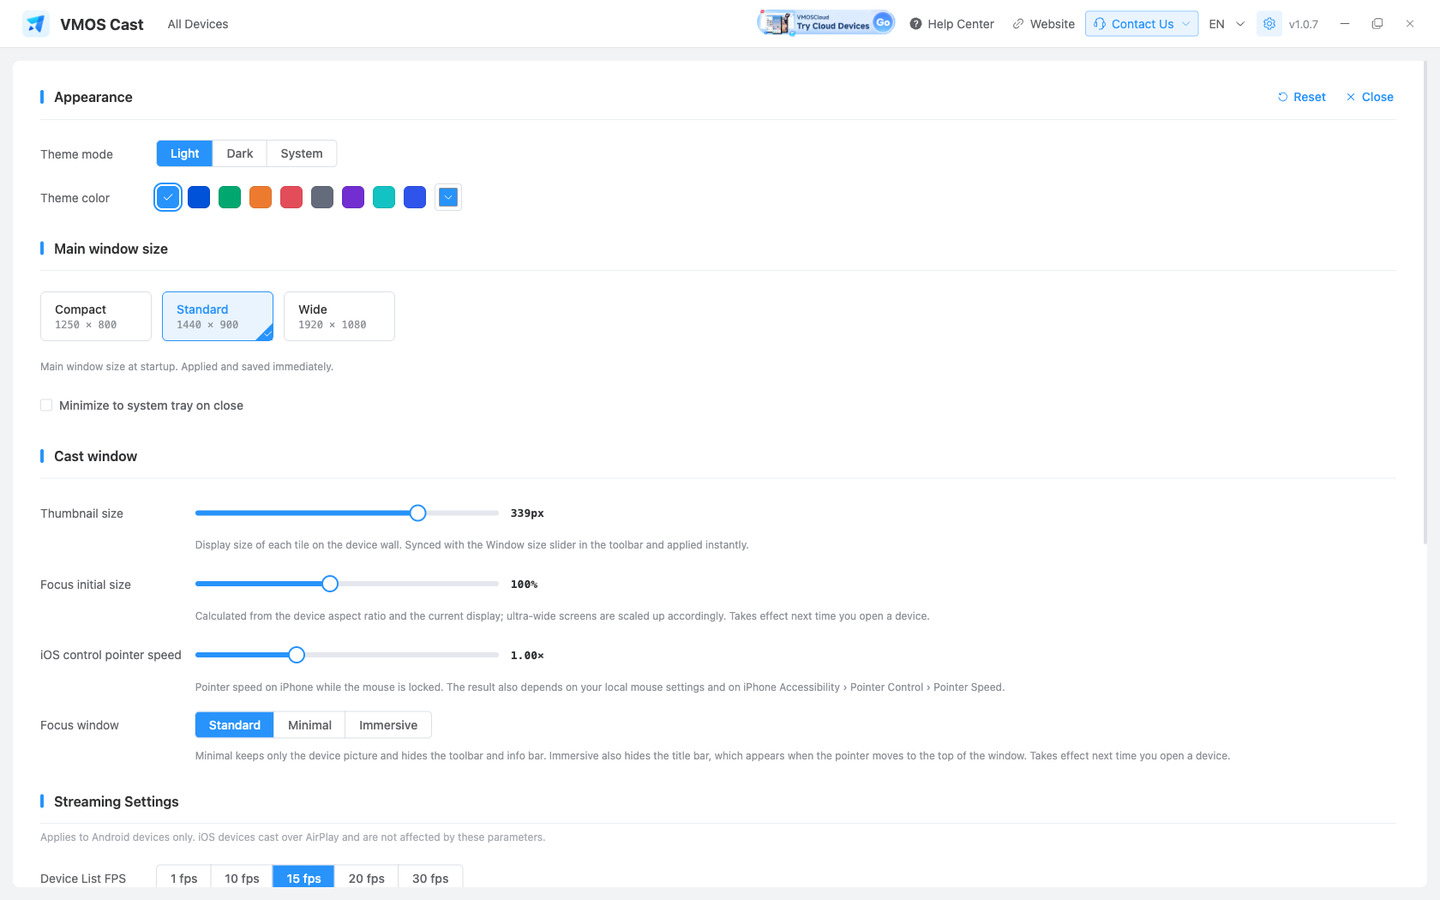
| Setting | Description |
|---|---|
| Theme mode | Light, Dark, or System |
| Theme color | A preset colour or a custom one |
| Main window size | Compact, Standard, or Wide — applied and remembered immediately |
| Minimise to system tray on close | See below |
| Thumbnail size | Display size of each tile on the wall; synced with the toolbar size slider and applied immediately |
| Focus initial size | See below |
| iOS control pointer speed | Tracking speed of the iPhone pointer while the cursor is locked; applies immediately |
| Focus window | Standard, Minimal, or Immersive; applies the next time a device is opened |
The interface language is switched from the top bar, not from Settings.
Closing the window (Appearance → Minimise to system tray on close):
- Unchecked (default): closing the window quits the application entirely, leaving no background process
- Checked: closing hides the main window to the system tray; the application keeps running and devices stay connected. Click the tray icon to restore it. To quit completely, right-click the tray icon → Quit
Focus initial size (20%–200%) does not affect quality or resolution — it sets the starting window size the next time a single device is opened. It accounts for both the long and the short edge, so an ultra-wide display does not open as a flat strip. Windows already open are unaffected.
The focus and multi-view title bars include a bulb-shaped Keep awake button. While lit, supported Android devices stay awake as if user activity were continuing. The device runtime refreshes user activity every four seconds so the normal timeout is prevented before the display turns off; it does not change screen-timeout settings or repeatedly turn the screen off and wake it again. In a mixed multi-view, unsupported devices are skipped without blocking other devices, and a notice appears when Keep awake is enabled or disabled. If a device stops accepting the operation while it is running, the button resets automatically and a notice appears. Selecting Turn screen off disables Keep awake first, then turns the display off. Turning Keep awake off or closing the window stops it immediately, and it is not remembered.
Streaming Settings and About:
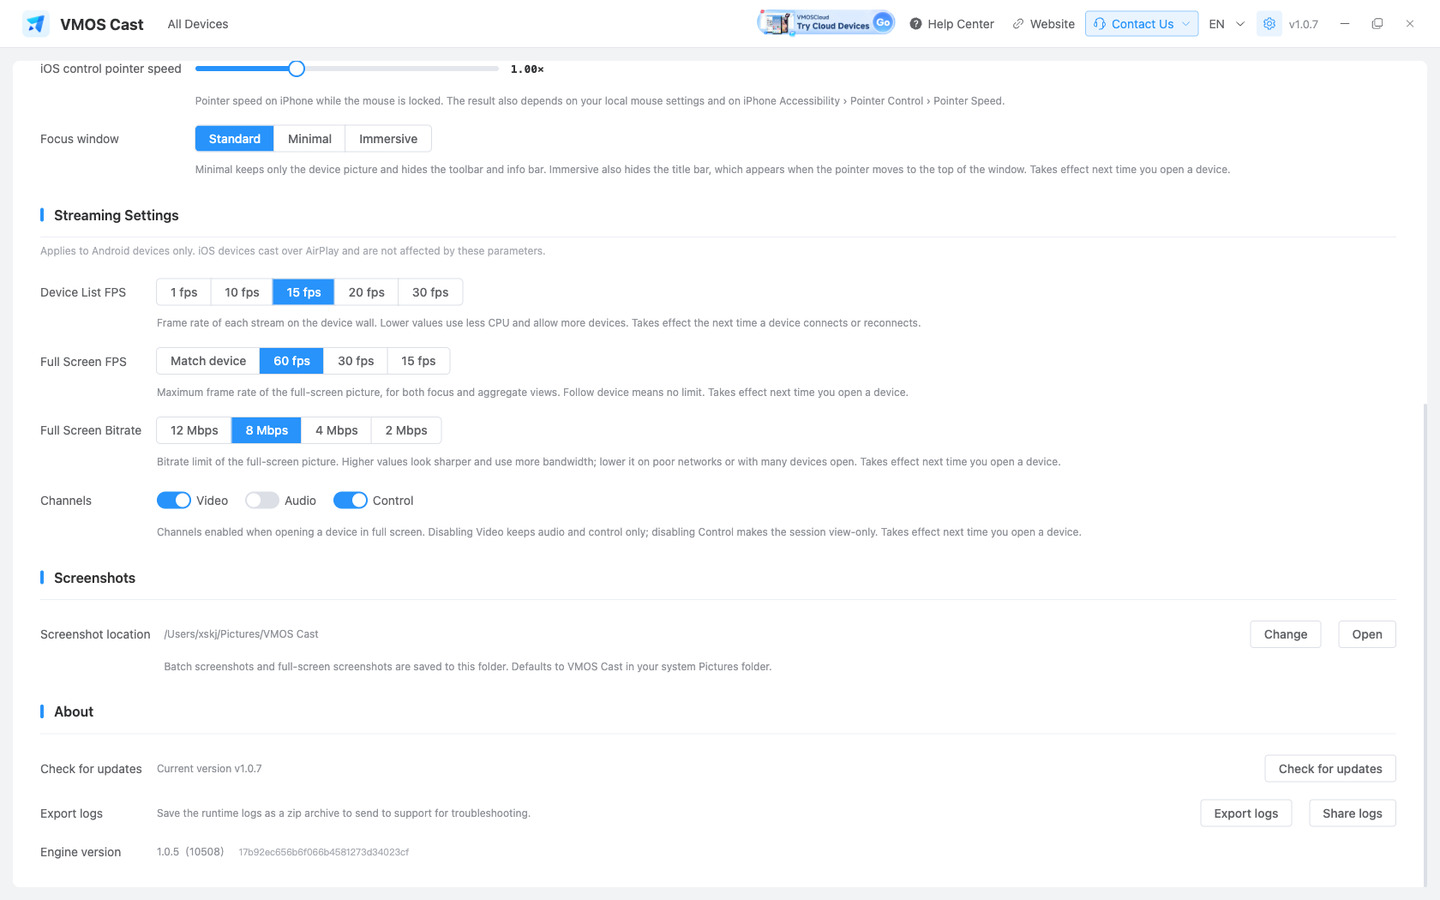
| Setting | Default | What it does |
|---|---|---|
| Device List FPS | — | Refresh rate of the small pictures on the main screen. 1 fps is the lightest; 10/15/20/30 fps switch to continuous video and apply immediately |
| Pause list picture while full screen is open | Off | Pauses wall thumbnails for devices shown full screen and resumes them when the window closes |
| Full Screen FPS | 60 | Maximum frame rate for full-screen views (focus window and multi-view). "Match device" removes the cap so high-refresh screens run at full rate |
| Full Screen Bitrate | 8 Mbps | Higher is sharper but uses more bandwidth |
| Channels | All on | Video / audio / control. Turning video off leaves audio and control; turning control off makes the session view-only |
| Screenshot location | System Pictures folder | Where batch and focus-window screenshots are saved |
Full Screen FPS, Full Screen Bitrate and Channels take effect the next time a device is opened; windows already open are unaffected.
TIP
Stuttering: lower Full Screen Bitrate (8 → 4 → 2 Mbps); if it still stutters, drop Full Screen FPS to 30 or 15. Blurry: first check whether the focus window's Quality panel is set to 720 / 1280 / 1920; choose Original for the device's source resolution. If it is already Original but compression is visible, raise Full Screen Bitrate to 12 Mbps. More responsive: on a high-refresh device, set Full Screen FPS to "Match device". Device List FPS is independent of those two: if the main screen is slow, change Device List FPS; if a full-screen view is slow, change the other two. To avoid duplicate traffic on a constrained network, enable Pause list picture while full screen is open. The wall thumbnail then pauses while the device is in a focus or multi-view window and resumes when it closes. This setting is off by default.
These parameters apply to Android devices only; an iPhone or iPad sends its picture over Screen Mirroring and is unaffected.
11 Device Status Reference
The six wall states, matching the Status filter one to one:
| Status | Meaning | What to do |
|---|---|---|
| Connecting | The picture is being established | A few seconds is normal |
| Device offline | Added but currently unreachable (powered off, different network, wrong address) | The device is retained and the picture is restored once it returns, without constant retries. To drop it, select the card and click Remove selected |
| Connection failed | The device is online, but the picture has not been established | Wait about half a minute — the app reconnects automatically. Remove and re-add only if it keeps failing |
| Connection timed out | Repeated reconnects produced no picture | Check the device, or restart it and reopen |
| Restricted by system security | The device is on a page with screen-capture protection | See below |
| Screen off | The device's screen is off | Wake it on the device, or use Wake screen in the focus window |
| Mirroring / Not mirroring | iPhone only: whether the device is currently mirroring | "Not mirroring" is not a disconnection — start mirroring again and it returns |
| Video is off | The video channel has been disabled | Turn it back on in Settings → Streaming Settings |
About "Restricted by system security": in addition to lock screens, payment and banking pages, copyright-protected video playback pages also enable capture protection, and Android blocks such pages from being mirrored. This is system behaviour, not a fault in the application.
The focus window switches to a degraded picture: still visible and still clickable (a lock-screen PIN can be typed directly in the window), at a lower frame rate. It returns to live automatically when the device leaves that page, and a "Restore live view" control is available. On a few devices even the degraded picture is unavailable, and only then does the card read "Restricted by system security".
TIP
In both states the device remains connected, and clicking the card still opens the focus window to show the message.
12 Using Several Computers at Once
The same device can be mirrored by any number of computers at the same time.
- Each computer's connection, windows and input session are isolated, and all of them can operate the device — tapping, system keys, typing, installing and uploading never wait on a "control token"
- Every computer sees the device's screen-on, screen-off and security states in real time
- Closing the app on one computer releases only its own connection and does not affect the others; the device-side service shuts down after the last client leaves
- The device-side control port is not exposed to the local network — it is reachable only through the connection the application establishes
13 Updates and Logs
Checking for updates: the app checks in the background after launch and shows a dialog only once a new version is confirmed and its release notes are complete. The dialog lists what changed and offers View Full Release Notes and Ignore this version — ignoring silences that one version, while later ones still prompt. Update now shows a real percentage, downloaded/total size, speed and time remaining; restart to finish installing. Updates can also be checked manually under Settings → About.
Exporting logs: when something goes wrong, use Settings → About → Export Logs:
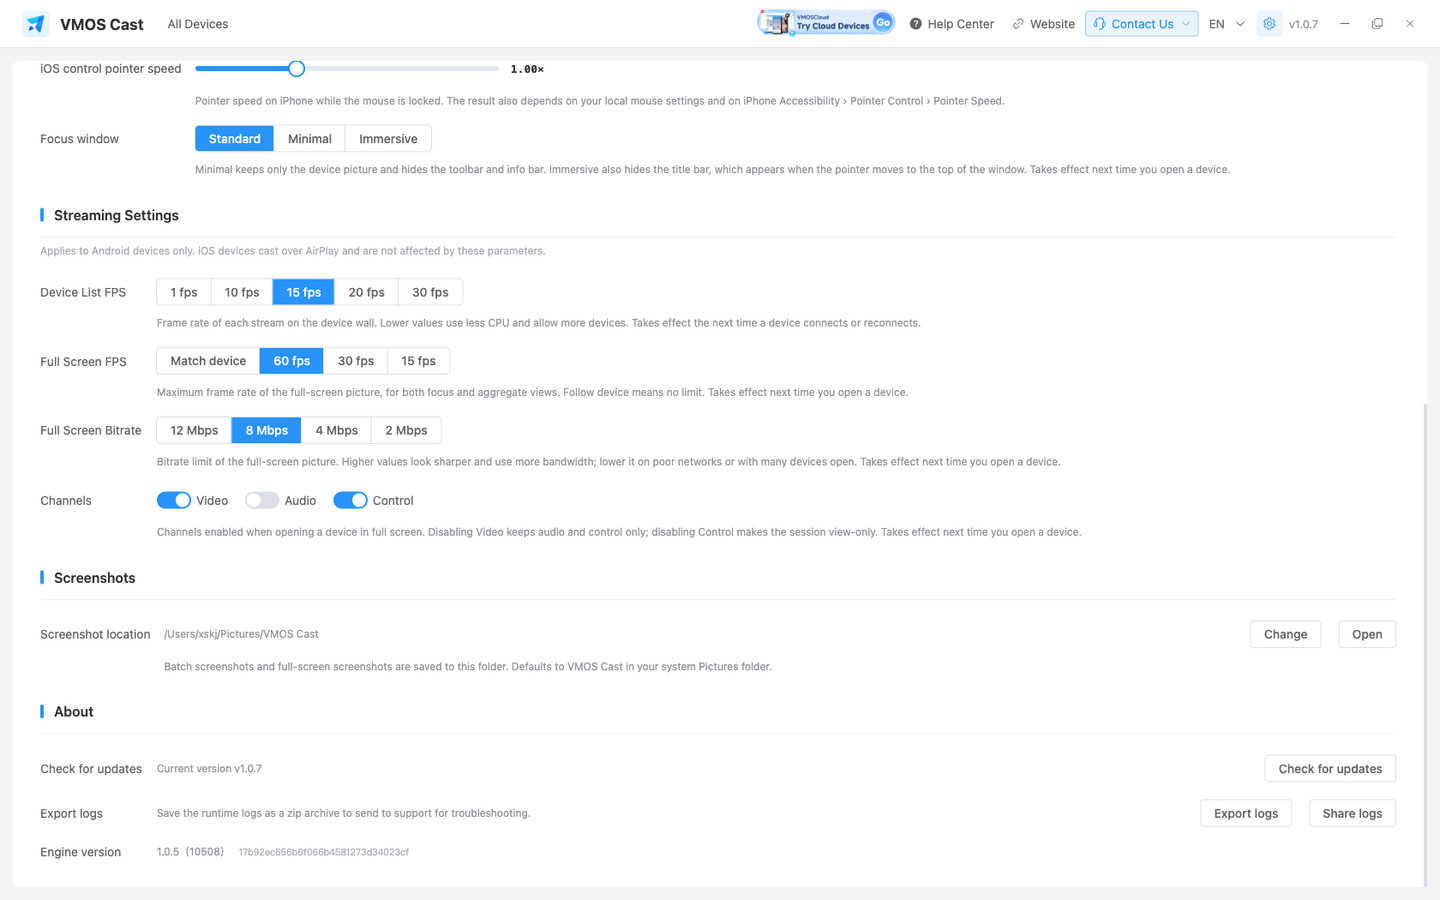
The zip contains the computer's logs, the complete device-side logs and on-device diagnostics — not truncated. With many devices connected, the 10 most recently active ones are collected; offline devices do not slow the export down.
On macOS, Share Logs alongside it builds the same bundle and opens the system share sheet directly.
When reporting a problem, include the computer's operating system and version, the connection method, the device model and Android version, plus a description and screenshots. See How to report a problem.
14 Quick Reference
| Goal | Route |
|---|---|
| Connect a physical phone for the first time | Enable USB debugging → connect the cable and allow → right-click the card → Add LAN connection → remove the cable |
| Connect a phone without a cable | Android 11+ wireless debugging pairing (six-digit code) |
| Add many cloud phones | Add Device → paste addresses in bulk, or scan a subnet → tick → Add |
| Mirror an iPhone | iPhone / iPad tab → Control Center on the phone → Screen Mirroring → select this computer |
| Install one package across a batch | Create a group → open it → Select All → Batch → Batch install |
| View a whole group in one window | Monitor icon on the group row → Multi-view |
| Sync gestures across devices | Select 2+ devices → Group Control |
| Monitor devices for long periods | Filter by group → smaller thumbnails → lower Device List FPS → dark theme |
| Fix a stuttering picture | Settings → Streaming Settings → lower Full Screen Bitrate, then Full Screen FPS |
| Report a problem | Settings → About → Export Logs → send the zip with screenshots |